FAQ
1.) Recommended mail clients
Q: Which email clients should be used at UZH?
A: The new Microsoft 365 Outlook system must meet current security requirements such as Multi Factor Authentication (MFA). For this reason, Outlook is the new standard for email and calendar applications (Windows, Mac, webmail). Other modern programs such as Apple Mail and Thunderbird support these requirements as well, but are partly limited in functionality. Should you face problems with these clients, please switch to Outlook. .
2.) Access help
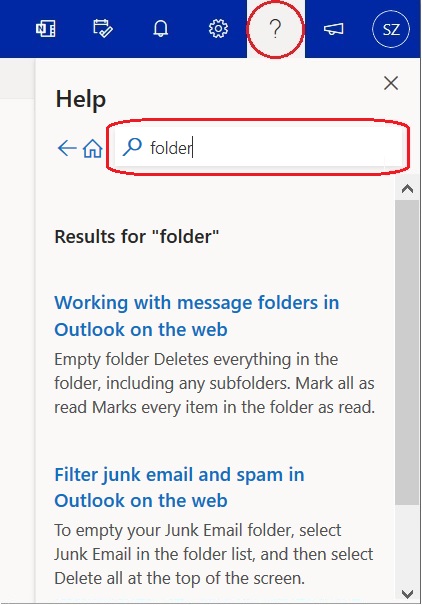
Q: What is the quickest way to get help?
A: In the top right menu bar, please select ...
- the question mark symbol
|

3.) Forwarding
Q: How do I automatically forward a message to another address?
A: In the top right menu bar, please select ...
- Settings (cog wheel symbol) > show all Outlook settings
- Email > Forwarding > Check Enable forwarding
|

MS Support: Turn on automatic forwarding in Outlook on the web
We would like to draw your attention to the fact that the automatic forwarding of official e-mails to an external address or storage location may violate data protection regulations.
See also Checklist Data Protection at Work of the Head of the Data Protection Law Department at UZH.
(old: www.dsd.uzh.ch, new: www.rud.ch).
4.) Rules
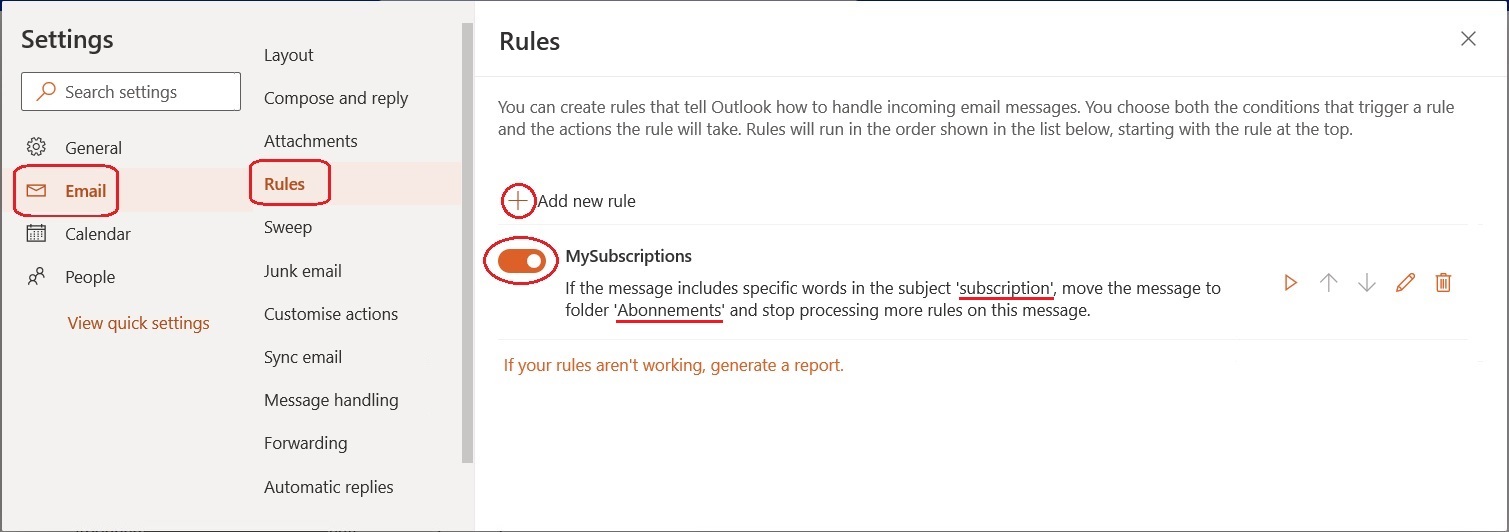
Q: How can I set up a rule for incoming emails?
A: In the top right menu bar, please select ...
- Settings (cog wheel symbol) > show all Outlook settings
- Email > Rules > Add new rule
|

MS Support: Use inbox rules in Outlook.com
5.) Junk email
F: How can I blacklist or whitelist an email address or domain?
A: In the top right menu bar, please select ...
- Settings (cog wheel symbol) > show all Outlook settings
- Email > Junk Email > Add
|

Notice:
-
Junk email rules in Outlook (web & desktop client) only apply to emails arriving in your Outlook client (mailbox) and have no influence on the upstream Microsoft Defender (quarantine, see FAQ 28). For the quarantine, the users and the Central IT department cannot define any rules. There are no classic white / black lists. However, users can, for example, release e-mails falsely declared as spam (so-called false positives) in the quarantine and thereby reduce their probability of being classified as spam in the future.
6.) Out of office reply
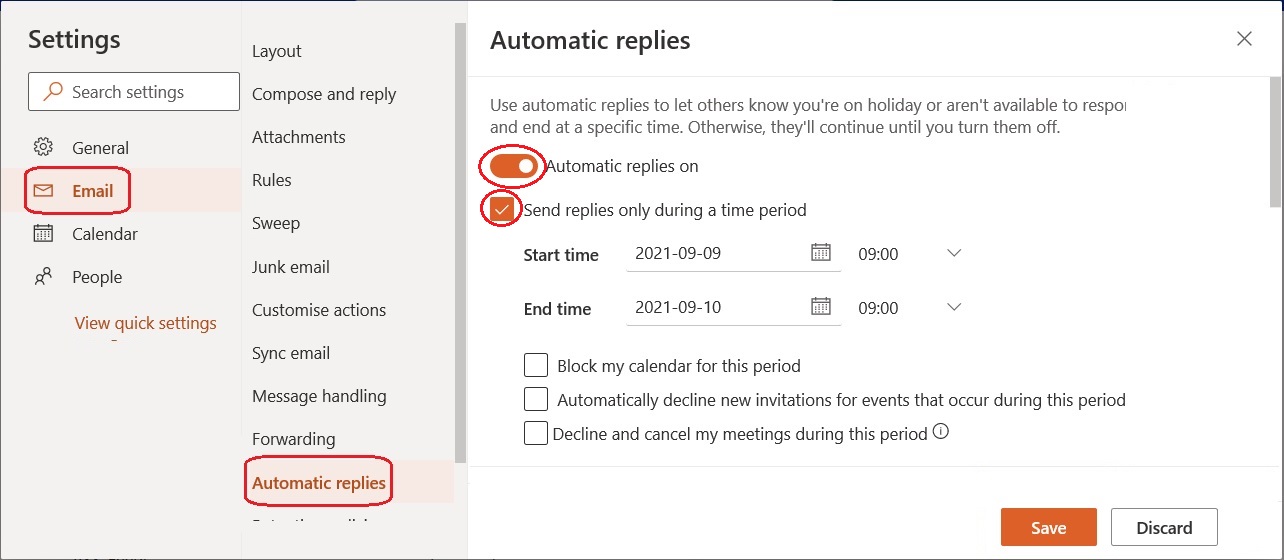
Q: How can I send an automatic out of office reply?
A: In the top right menu bar, please select ...
- Settings (cog wheel symbol) > show all Outlook settings
- Email > Automatic replies
|

MS-Support: Send automatic (out of office) replies in Outlook on the web
Please note:
- A sender always receives only one out-of-office message from the absentee per agent activation.
- Furthermore, Notes users would be seen as 'external persons' by Outlook, i.e. the checkbox 'Send replies outside your organization' must be activated in the Outlook settings of the out-of-office user. This is the case for as long as the two systems coexist, but not afterwards.
-
The out-of-office text for the external persons has to be entered separately in the text field below (please scroll down the window if not visible.).
7.) Signature
F: How can I add a signature?
A: In the top right menu bar, please select ...
- Settings (cog wheel symbol) > show all Outlook settings
- Email > Compose and Reply
|

Hinweise:
- Multiple signatures can be created. For example, one for new messages and one for replies / forwards.
- MS support: Create and add an email signature in Outlook.com
- UZH internal Guidelines of phonecalls, voice mail and out of office (German only)
8.) Search
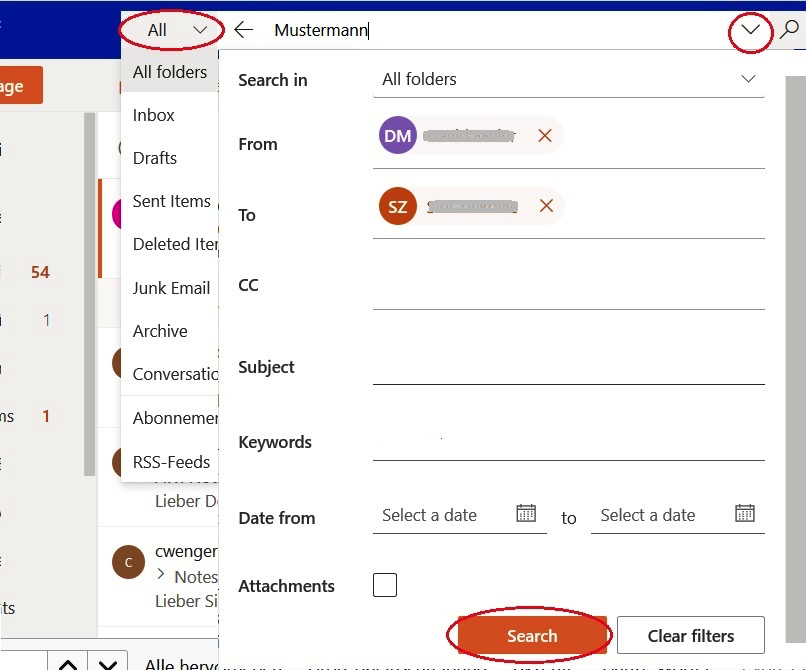
Q: How can I search my emails?
A: To the left of the search field, you can select the folders to be searched, to the right you can select the fields to be searched. Finally, select the Search button.
|

9.) Multifactor Authentication (MFA)
Q: What is multifactor authentication (MFA)?
See our instructions under Microsoft 365 and multifactor authentication
If you change devices, you must first register the new device in your M365 account (accessible on another available device) under the Security information tab. This requires a new login method to be added. If you select the Authenticator app method, you will be asked to scan the QR code in your account (on the old or other available device) using the new device and the newly installed Authenticator app. This will link the Authenticator app on the new device to your M365 account. Finally, add your desired business or school account in the MS Authenticator app on your new device. See also ...
10.) Copy (migrate) mail and mail folders from HCL Notes to Microsoft 365 (Outloook) account
Q: How can I migrate the contents of my HCL Notes mailbox to my Microsoft 365 (Outlook) account?
A: Please consult our instructions for migrating mail and mail folders (DE) (PDF, 322 KB). In the document, you will find information on how to integrate your HCL Notes mailbox and your Microsoft 365 (Outlook) account in the email clients Apple Mail, Outlook and Thunderbird and then move the contents there via copy & paste.
11.) Apple Mail with Exchange
Q: How can I access my UZH Exchange account with Apple Mail?
A: When configuring your account in Apple Mail, please select Exchange as the account type, log in to Microsoft with your shortname or primary email address and to the University of Zurich with your Active Directory password.
- Click on the plus symbol
- Select the Exchange option
- Click on Continue
- Enter your short name in the [Name:] field.
- Enter your primary UZH email address in the [Email address:] field.
- Click on Log in
- Click on Log in to Microsoft.
- Log in to UZH using your primary email address and Active Directory password.
- Confirm login request via Authenticator app on mobile device.
- Click on Done.
12.) IMAP clients (e.g. Thunderbird)
Q: How can I access my UZH emails with an IMAP client, for example Thunderbird?
A: When setting up manually, please first select detect automatically for authentication. The necessary authentication method OAuth2 will only be available after selecting detect automatically first.
| Protocol: | IMAP | SMTP |
| Host name (mail server): | outlook.office365.com | smtp.office365.com |
| Port: | 993 | 587 |
| Security: | SSL/TLS | STARTTLS |
| Authentication method: | OAuth2 | OAuth2 |
| User name: | Email address | Email address |
To configure a shared mailbox (formerly Mail-In), please proceed as described in the following instructions.
The steps are identical for both Mac and Windows.
13.) Mobile devices
Q: How can I access my UZH account with my mobile device?
A: This is possible via the Outlook App as well as most native email apps.
Outlook Mobile App
Apple Mail for iOS
When configuring your account in Apple Mail for iOS, please select Exchange as your account type, log in to Microsoft with your primary email address and to the University of Zurich with your Active Directory password.
- Open Settings..
- Click on Passwords & Accounts.
- Click on Add Account.
- Select Microsoft Exchange as the account type.
- Enter your primary UZH email address & description and click Next.
- Click on Log in to Microsoft.
- Log in to UZH using primary email address and Active Directory password.
- Confirm login request via Authenticator app on mobile device.
- Click on Save.
14.) Access to shared (Ger. 'geteilte') Mailboxes (formerly Mail-Ins)
Q: How can I access my shared (Exchange) mailboxes after switching to Outlook?
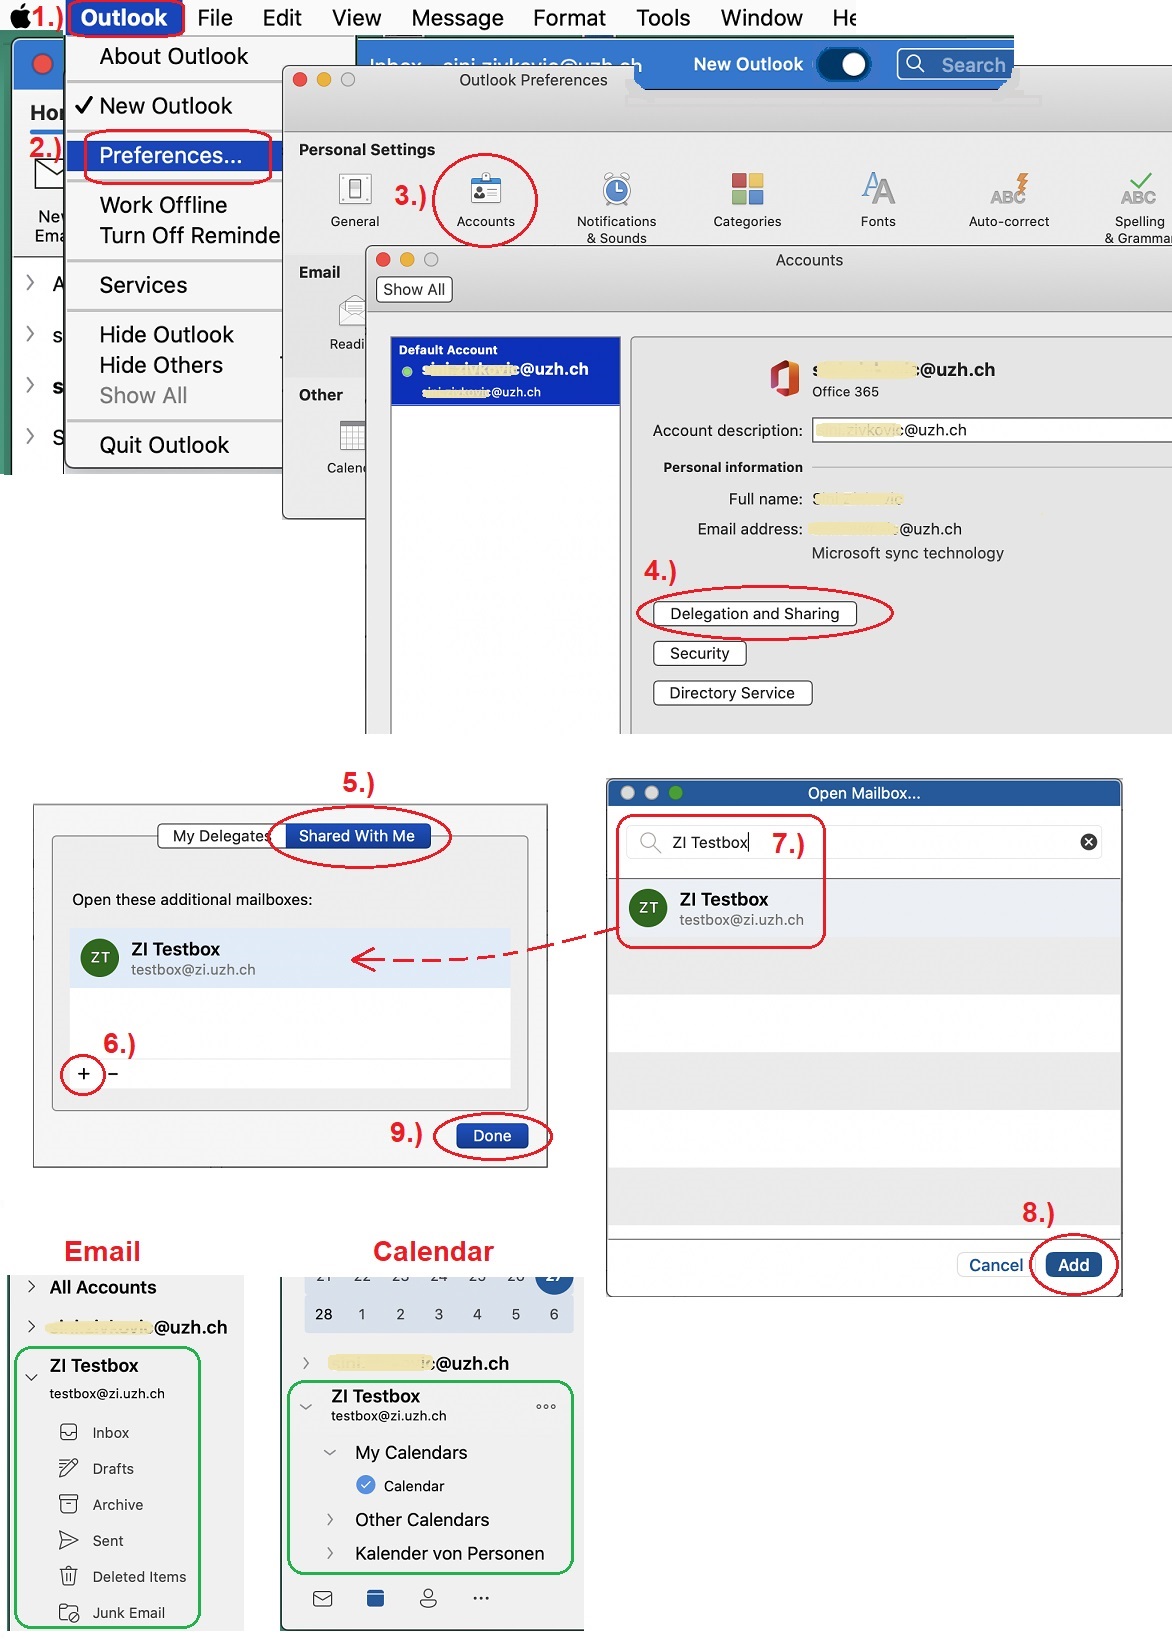
A: The mail-in is not configured as an additional account, but added as a 'shared mailbox'. It is displayed as a folder structure in the email view and as a show/hide calendar in the calendar view.
Outlook for Mac (OS 10.15.7) ("new Outlook" enabled):
Select Outlook > Preferences > Accounts > select the account with access to the shared mailbox (your own account)
> Delegation and Sharing > Shared With Me
> plus symbol '+' (lower left) > select account > add > done
(To remove a shared mailbox, please select the minus symbol '-'.)
Outlook for Mac ("new Outlook" disabled):
Select Outlook > Preferences > Accounts > select the account with access to the shared mailbox (your own account)
> Advanced > Tab Delegation
> Plus symbol '+' (lower left) in "Additionally open these shared mailboxes" > Add > OK
(To remove a shared mailbox, please select the minus symbol '-'..)
Outlook for Windows:
Open and use a shared mailbox in Outlook
(To remove a mailbox, select 'remove' instead of 'add'.)
Outlook on the Web:
Open the following URL in your browser (insert appropriate mail-in email address):
-> https://outlook.office365.com/mail/mailinemailadress/
(You can remove a mailbox with the context menu command "delete".)
see also Open and use a shared mailbox in Outlook on the web
Hint:
- If you have been granted "full access" to a shared mailbox by your IT manager, you can open the mailbox in a separate browser window (via Account Manager) and delegate access rights to individual folders there (according to FAQ 26 "Access to other folders"). .
-

- Zoom (JPG, 42 KB)
-
Fig.: Open another mailbox
(Click on the magnifying glass icon to enlarge).
-
Outlook for iOS / Android:
Add a shared mailbox to Outlook mobile
Shared mailboxes cannot be configured on mobile devices without Outlook application.
|

Notes:
See also our video and two additional support pages:
VIDEO: Zugriff auf andere Konten (Mac, new Outlook; German only) (MP4, 8 MB)
Create a shared mailbox (for administrators)
Geteilte Mailbox in Outlook richtig einrichten (Caching) (German only)
Note: Currently, users cannot add a mail-in as a new (Exchange) account in Apple Mail and Outlook Desktop versions, as is the case with the personal mailbox. Currently, shared mail-ins automatically appear as shared mailboxes that cannot be removed. In Thunderbird, on the other hand, you can set up shared mail-ins via IMAP (see FAQ 12).
15.) Appendix: Rules in shared mailboxes
Q: How can I create rules in shared mailboxes after the migration to Outlook?
A: Please use...
- Outlook on the web (outlook.office.com) to create rules (see FAQ 4 "Rules") in shared mailboxes.
- This is currently not possible with desktop email clients such as Apple Mail and Outlook for Windows/Mac.
- This is not possible with desktop email clients such as Apple Mail and Outlook for Mac (old version).
- In Outlook for Windows, please add the desired mail-in accounts to the your profile beforehand. After that, these accounts will be available for selection during rule assignment.
- In Outlook for Mac (new version), please add the desired mail-in accounts in advance in the program settings (Delegation and Permissions). Afterwards, the mail-ins will appear for selection during rule assignment. Restart Outlook if necessary.
- In Thunderbird you can set up shared mailboxes (see FAQ 12) and create filters. While these filters are not displayed as rules in the other clients (e.g. Outlook on the web), they are nonetheless active.
- For the latest information on how to access shared mailboxes, see FAQ 14 "Access to shared mailboxes".
16.) 'Sent Items' Folder
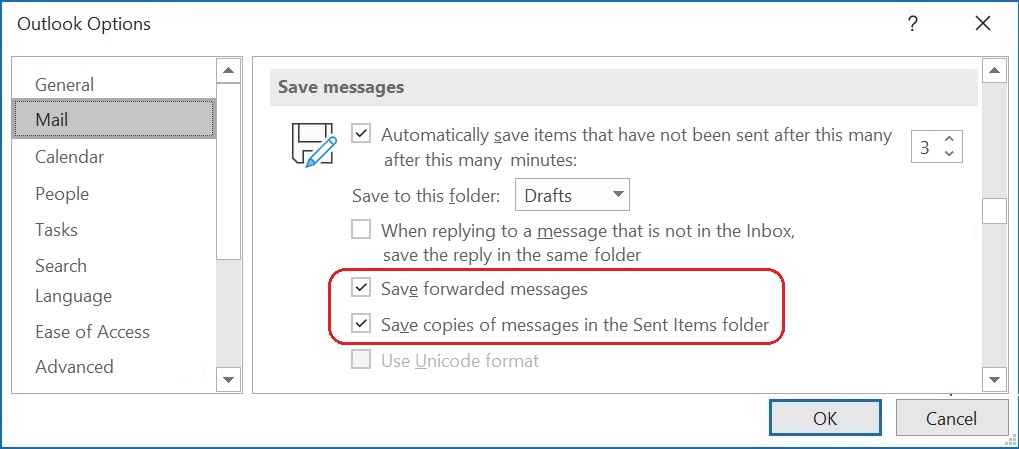
Q: Why are my sent e-mails not displayed in the 'Sent Items' folder (Outlook desktop version)?
A: Please check in the Outlook settings of your Windows desktop client whether the following checkboxes are activated:
- Menu "File" > Options > E-mail > Save messages section.
> Save forwarded messages. - Menu "File" > Options > E-mail > Save messages section.
> Save message copies in the 'Sent items' folder.
|

These settings are only available in the Outlook Client for Windows, not in the Mac or Online versions.
17.) Profile
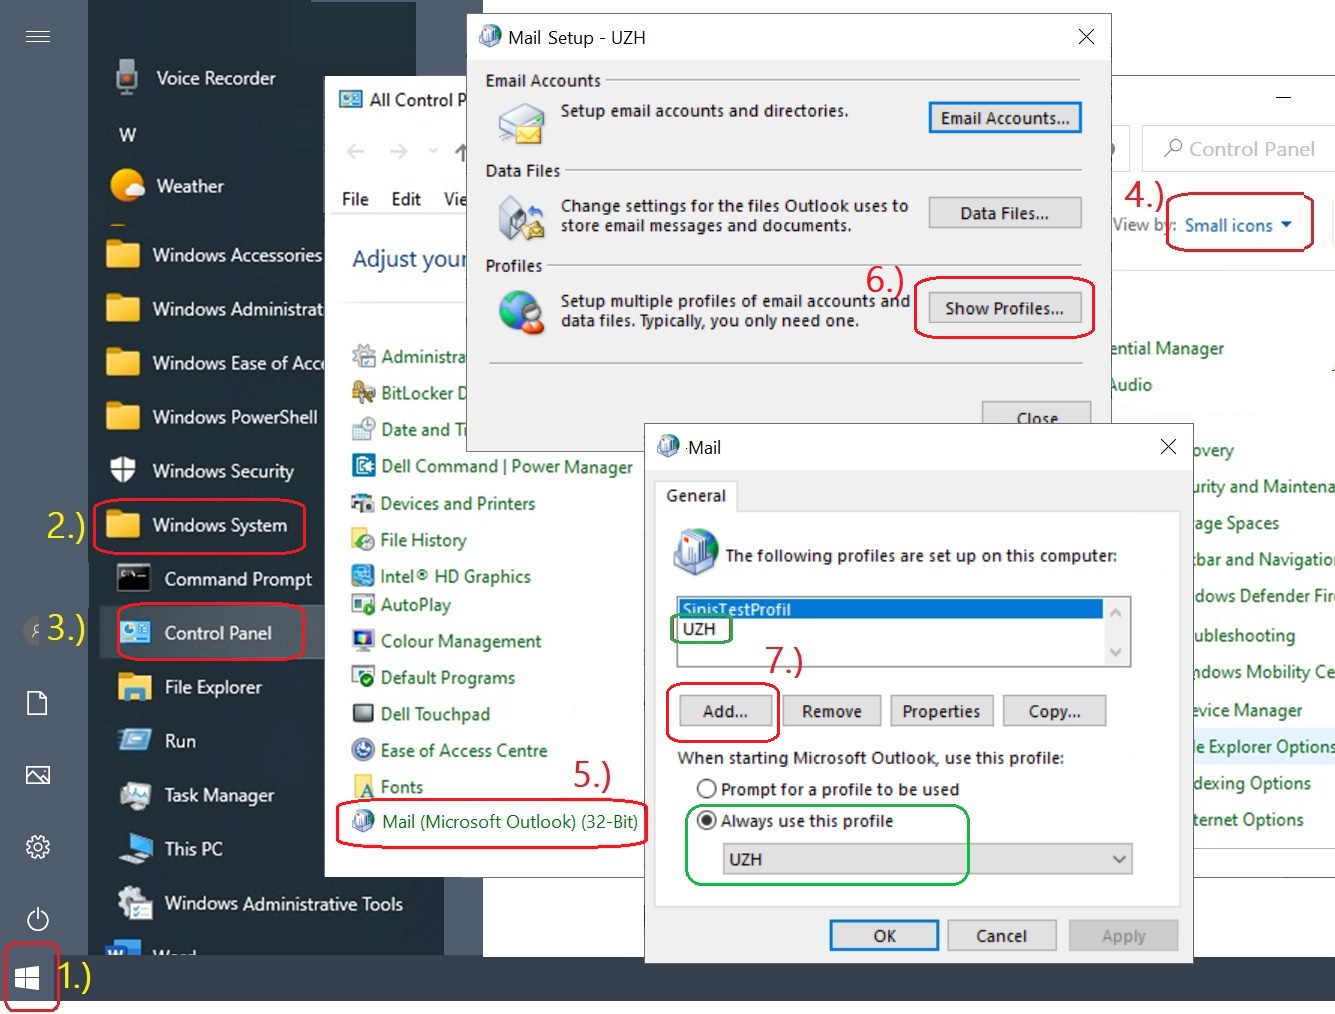
Q: How do I create a new profile in Outlook?
A: You can find answers to the most important questions about profiles (Outlook desktop version and Windows) on the following Microsoft (MS) support page:
Outlook email profile overview
Answers to specific questions can be found on the following MS support pages:
Create an Outlook profile
Edit an Outlook profile
Switch to another Outlook email profile
Illustrated and UZH-specific instructions are available in the file CreateOutlookProfile (DE) (PDF, 268 KB).
In short:
- Windows Start > Windows System > Control Panel > (Small Icons)
> Mail (MS Outlook)(32-bit) > Show Profiles > Add > OK
|

You can find instructions for Mac operating systems here:
Managing profiles or identities in Outlook for Mac
Notes:
- An email profile consists of email accounts, data files and information about where your email is stored. The data includes rules, messages, contacts, calendars, notes, tasks, journals, search folders and other settings.
- Once created, the profile name cannot be changed, but the profile itself can.
- Outlook e-mail profiles (Windows) are stored in the Windows registry. When Outlook is started, the profile information is retrieved from the registry.
18.) Standard Email Application
Q: How can I set Outlook as the default email program?
A: You can find an illustrated tutorial on our first steps page Windows: Set Outlook as Default Mail Application.
In brief:
- Windows Preferences (cog symbol) > Apps
> standard apps (left side) > set defaults by app (lower right)
> search for app Outlook > click Manage
> Change all entries which are not currently reading Outlook to Outlook.
To do this, click on an item and choose Outlook from the popup menu.
Please note:
If you are still working with the Notes client, please deactivate the following two checkboxes by selecting...File > Preferences (Mac: HCL Notes > Preferences) > Mail > Internet:
- Use HCL Notes as my default e-mail program.
- Check on startup that HCL Notes is my default e-mail program.
19.) Room Reservation
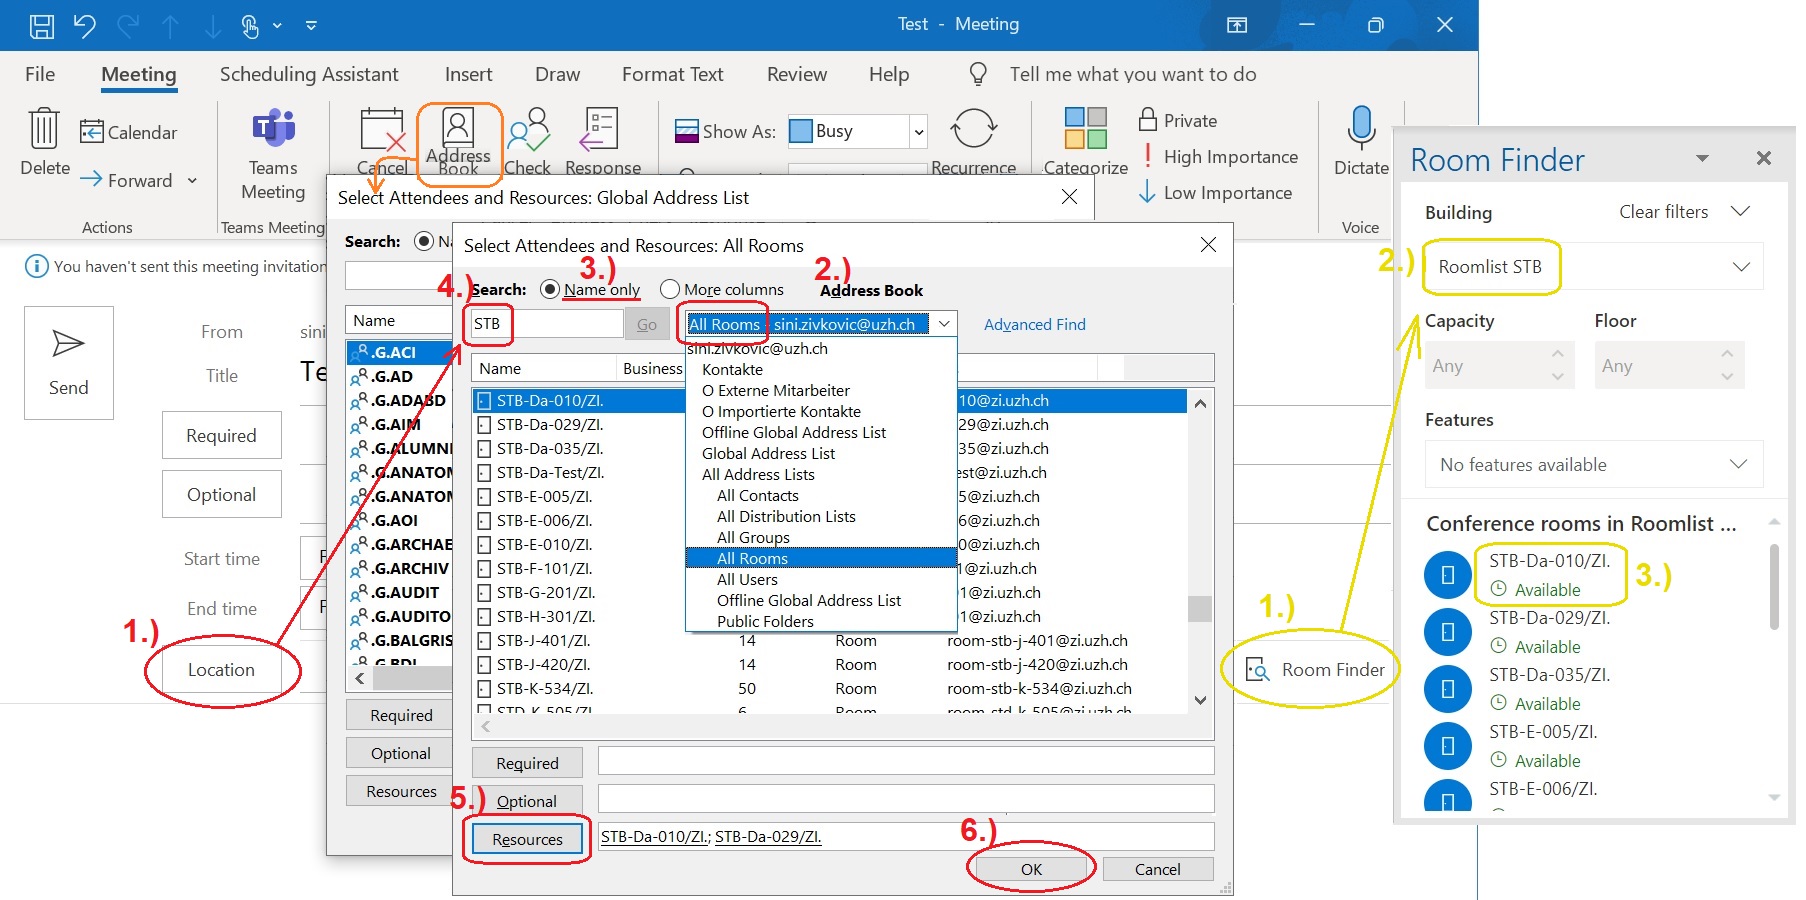
Q: How can I reserve a room?
A: In Outlook, you can reserve rooms and resources in three ways while creating a meeting:
- Invite attendees > menu command Adress Book
- Button Location > address book All Rooms > search option: Name only > search field: Room name > Button Resources > OK
- (Invite attendees >) Button Room finder > Building: select room list > Conference rooms: select room
The same three room selection dialog boxes are available in the Scheduling Assistant with the buttons...
- Add Attendees, Add Rooms and Room Finder.
Outlook on the web only offers the search function Search with Room Finder in the field Location.
|

Please note:
- In the search fileds, the first occurring letters are searched for.
- For example, if 'm' is entered in the field 'Building', 'Roomlist AFL' appears at the top of the results list.
- If ' m' (space plus 'm') is entered, 'Roomlist MOO' and 'Roomlist MUG' appear.
- If 'mo' is entered, only 'Roomlist MOO' appears. - Please make sure to book the rooms as Room (field Location), and not as a Required Attendant.
- If you reserve a room in Outlook on the web (e.g. in your own calendar), this reservation will also be synchronized to the Outlook desktop client (in the corresponding calendar) and vice versa.
- Should newly created calendar entries not be visible right away, please...
- refresh the calendar view or ...
- check if the scroll bar is in the correct position or ...
- wait for a few seconds. Sometimes the synchronization takes a bit longer.
- The room is only definitely booked if you receive a confirmation email after submitting the appointment.
20.) View E-Mail (MIME-) headers
Q: Where can I view an email's (MIME-) header?
A: Outlook on the web:
- Open the email or select it in the inbox preview.
- Select the three dots '...' (upper right), then View > View message details
- Alternatively: Select the email in the email overview and directly open the context menu by selecting View > View message details.
|

Outlook:
- Double click (open) an email message.
- Menu command File > Button Properties
- Section Internet headers
|

Please note:
- MIME stands for Multipurpose Internet Mail Extensions. They are extensions of the Internet standard.
- Headers show fields specific to each message, e.g. sender, recipient, subject line, time received, client, mail server or spam score (X-SpamScore). Spam score is important concernt Spam emails. A message is judged as spam or non-spam, depending on this field's value and your personal Spam Manager settings (field Necessary points for marked as SPAM on t.uzh.ch/profile, section 'SPAM'.).
21.) Email Encryption
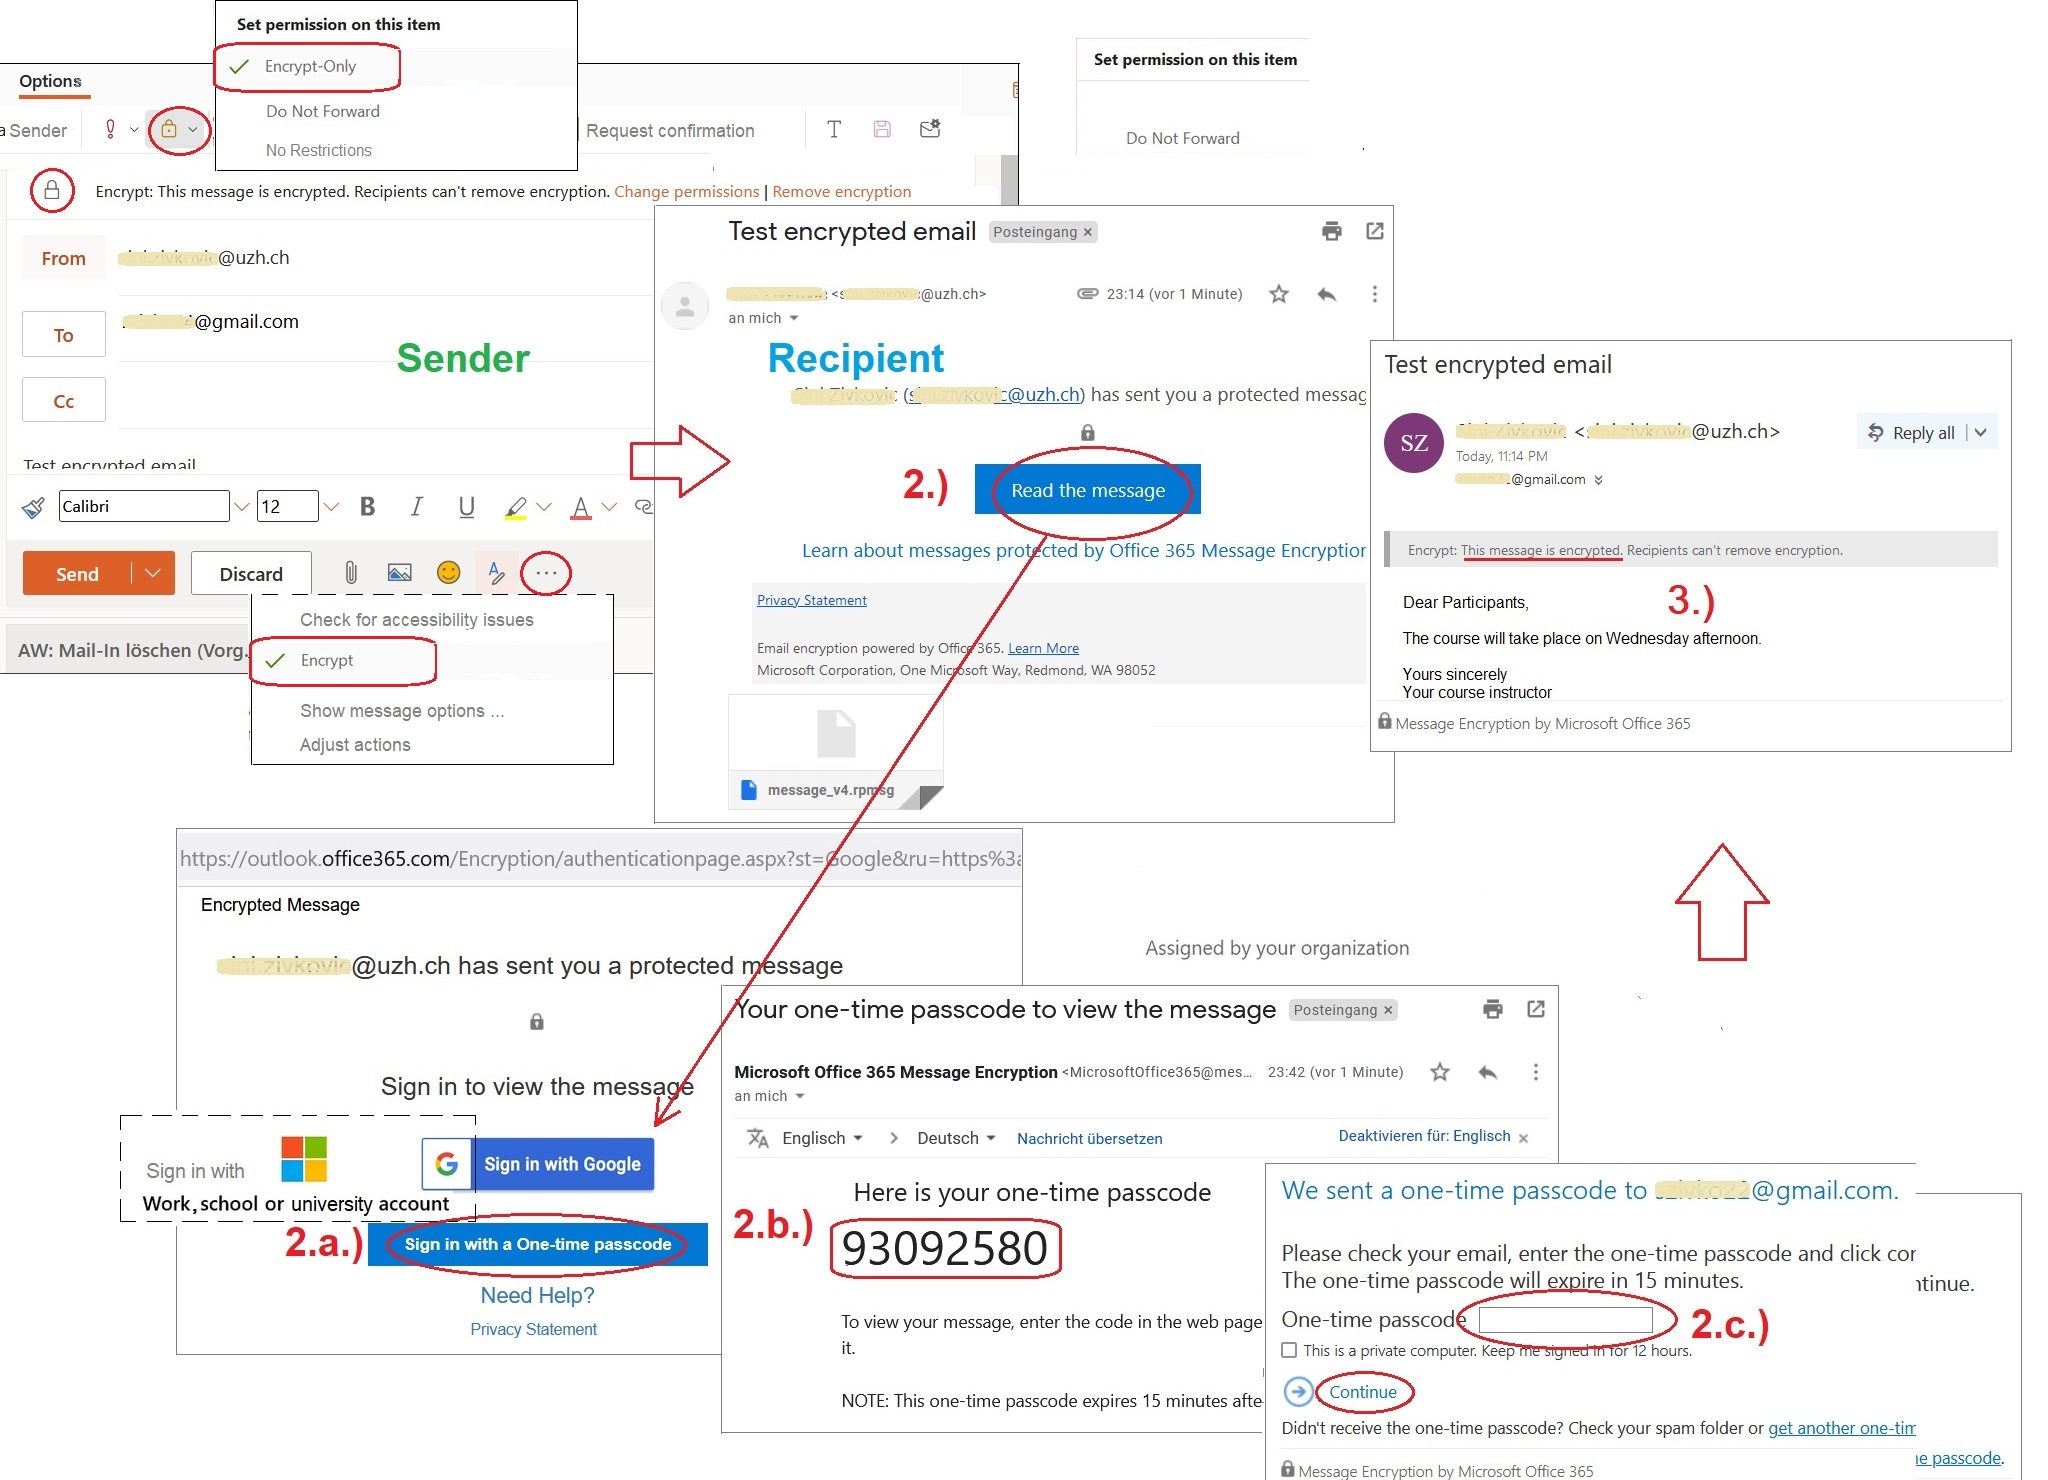
Q: How can I send encrypted emails?
A: Outlook on the web:
- When composing an email, additionally click the Encrypt button.
- The encrypted email is marked with a lock icon.
- Non-UZH recipients will receive an email with the button 'Read the message' and then either sign in with their respective provider or a one-time passcode
- This automatically opens a separate browser window in which the email may be read.
|

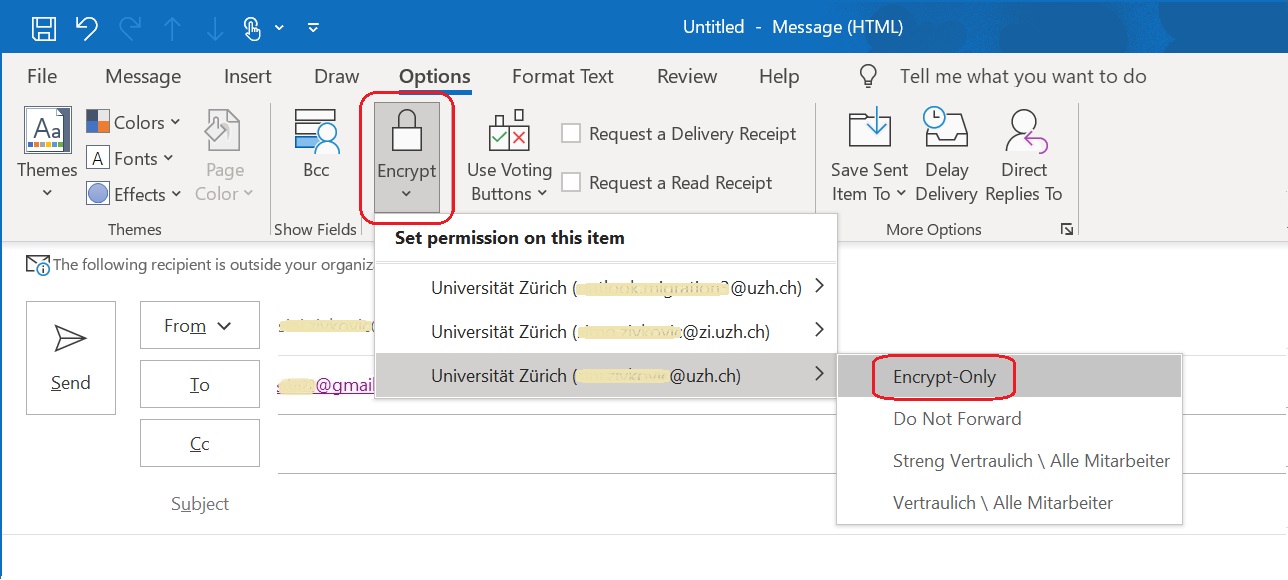
Outlook:
- When composing an email message, select the menu commands Options > Encrypt > Encrypt-Only.
|

Please note:
- Encryption via Microsoft 365 is not true end-to-end encryption, where the keys for encryption and decryption would only be exchanged between the communication partners. The keys reside on Microsoft servers. Advantages: Reduces administrative effort, simplified user experience, and allows emails to be checked for viruses by Microsoft before they arrive.
-
For detailed information, please go to the relevant Microsoft support pages:
Encrypt email messages
Encrypt messages by using S/MIME in Outlook Web App
Note: As a rule, no encryption is required for internal UZH communication. In certain cases (e.g. classifiction level 'secret'), encryption may nevertheless make sense for very confidential content.
22.) Outlook for Mac versus Outlook for Windows
Q: What are the differences between Outlook for Mac and Outlook for Windows?
A: Among other things, the Mac version does not offer the following functions:
Email:
Export or backup emails to an Outlook .pst file
Use voting buttons in messages
Message recall
"Ignore" and "Clean up" messages
Archive folders automatically
Save emails in different formats (HTML/TXT)
Add or remove columns in the Inbox
View message headers
-> Workaround: Mailheader in Outlook für Mac (German only)
Change the order of folders
Syncing filters
Assign retention policies on email messages
Standard settings for sending messages
Advanced junk email filters
Add graphics to messages
Subscribe to RSS Feeds
Find Related Messages
Send an email as a distribution list
Create reuseable text blocks for email messages
Only possible in the Mac version:
View email of multiple accounts in one inbox
Calendar:
View multiple calendars at the same time (Mac: max. 3 calendars)
Sync Sharepoint Calendars and Lists
Contacts:
Sync contact groups with Exchange
Tasks:
Please note:
- A more comprehensive listing can be found on Microsoft's support pages:
Compare Outlook 2016 for Mac with Outlook 2016 for Windows -
Outlook for Mac is constantly being improved and extended:
Outlook for Mac - Release notes for Beta Channel builds
The new Outlook for Mac
23.) Creating a Distribution List
Q: How can I simultaneously add multiple contacts to a contact list (contact group)?
A: Please create a CSV file in Excel or a text editor (e.g. Notepad on Windows), import it to Outlook and move the contacts imported this way in the Contacts directory to a contact list you created yourself.
Create a CSV File:
- Excel: write contact data in first column and save file in CSV format (UTF-8) (Fig. 1).
- Notepad (Windows): Write down contact data line by line and save file as CSV file (Fig. 1).
- Specify file name, e.g. "Contacts.csv" (including quotation marks).
- The file format *.csv is not directly available for selection.
Please label first line correctly with the field names (e.g. 'E-Mail-Adresse' (German) or 'E-mail Address' (English)).
See also Create or edit .csv files to import into Outlook
|

Import CSV file:
- Outlook on the web:
People > Manage > Import contacts > Browse > Select CSV file > Open > Import.
See also: Import contacts to Outlook.com - Outlook for Windows:
File > Open & Export > Import/Export > Import from another program or file
> Next > Comma Separated Values > Next > Select CSV File
> Next > Select a destination folder > Next (> If desired, select Map Custom fields) > Finish
See also Import contacts to Outlook
Note: Contacts can also be imported into self-created folders. - Outlook for Mac:
Importing Excel or CSV files is not supported.
Create a contact list:
Create a contact group or distribution list in Outlook for PC
Create a contact group (video)
Synchronization of contact groups with Exchange is not supported in the Mac version.
Move contacts to contact list:
-
Outlook on the web:
Select contacts > Toolbar option Add to list
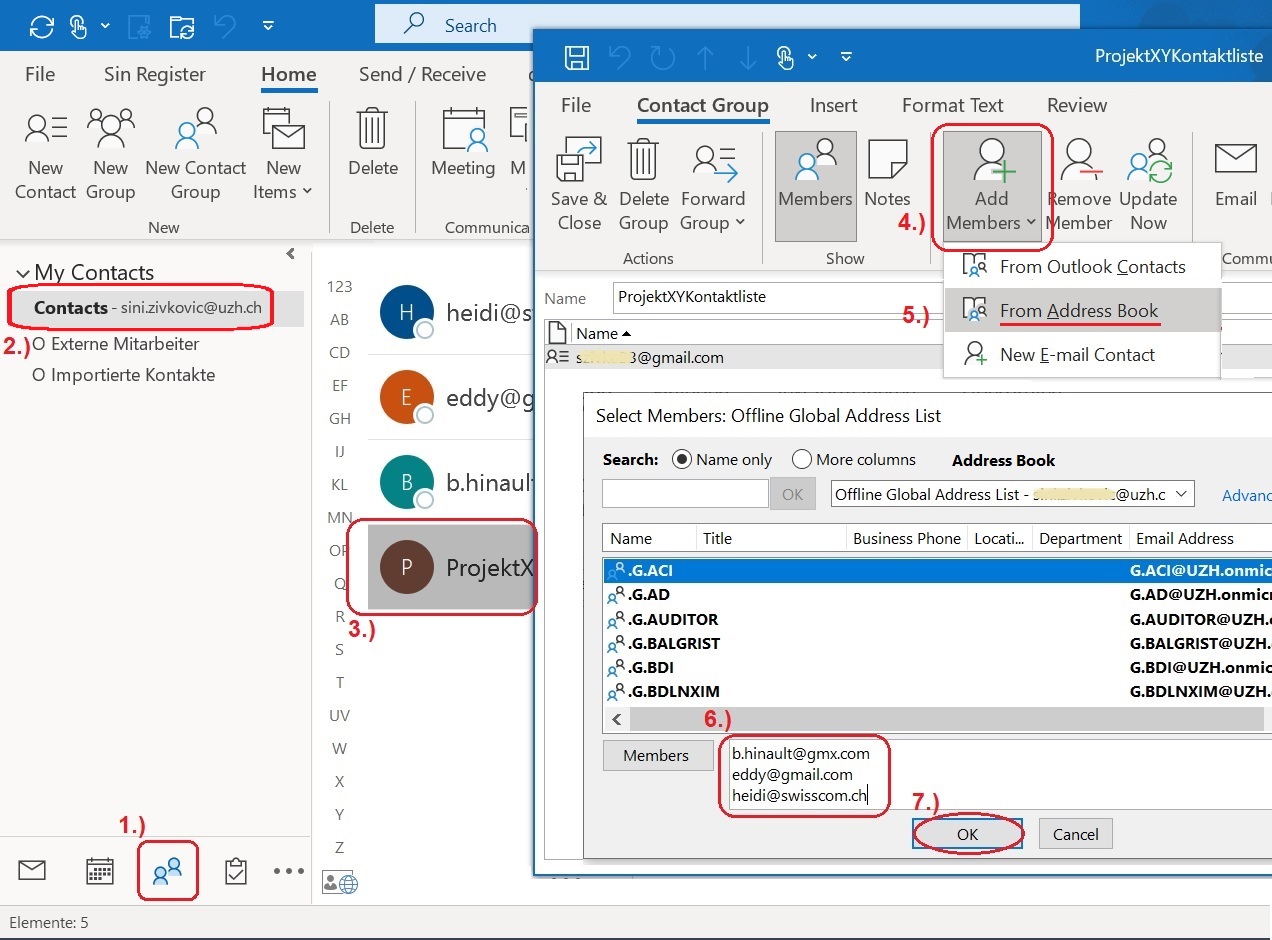
See also: Create, view, and edit contacts and contact lists in Outlook on the web - Outlook for Windows:
Select contact group > Edit contact (three dots '...') > Add Members
> From Outlook Contacts > Select desired members > Button "Members" > OK
See also: Add people to a contact group in Outlook for PC
Alternatively, Outlook for windows allows copying email addresses directly into the contact list's Select Member field.
|

- In the desktop version, a contact list is called a Contact Group, not to be confused with the shared Groups.
24.) Templates
Q: Can I use message templates in Outlook on the web?
A: Yes. Please refer to ...
Outlook for Windows:
Create an email message template
Send an email message based on a template
Outlook for Mac:
Can I create email templates in Outlook for Mac?
Outlook on the web:
Outlook Web Access My Templates
Cannot save templates in My Templates
(please note: text blocksare also available for Outlook for Windows, but not for Mac.)
25.) Calendar Access Rights
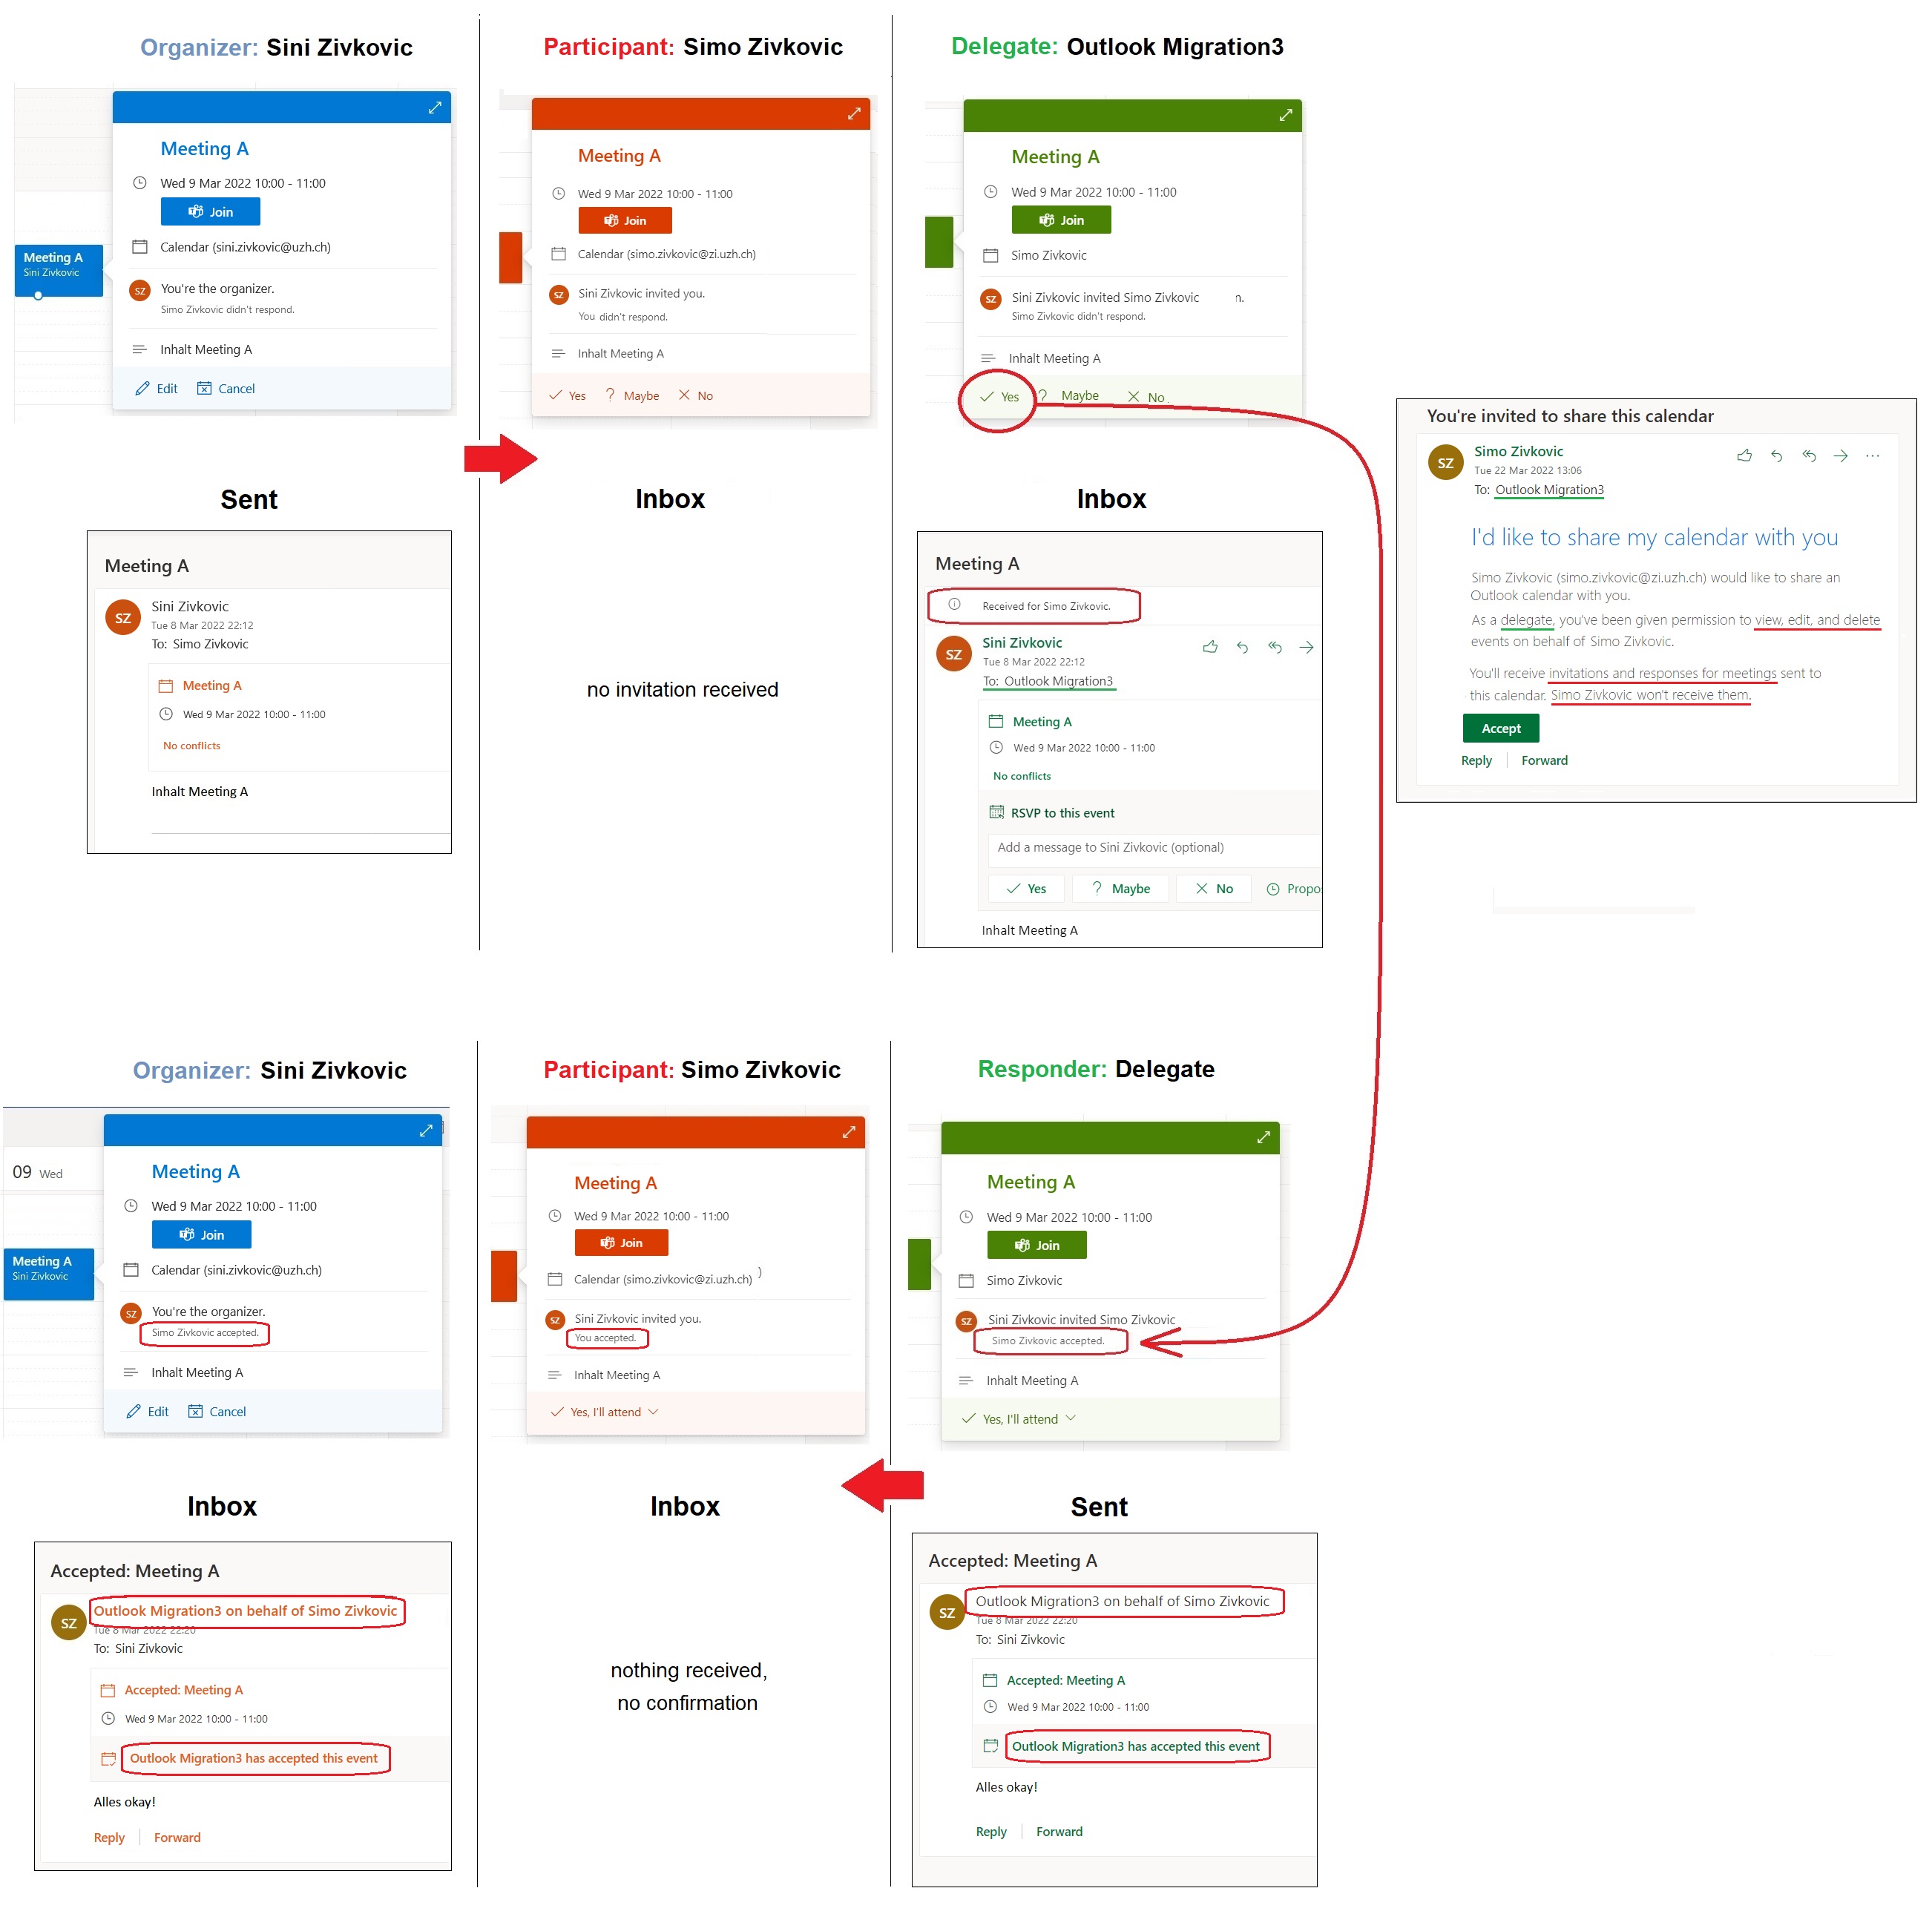
F: What options do I have to allow others access to my calendar?
A: Depending on the selected permissions (Fig. 1), others can view or edit calendar or act as your delegate for meeting invitations (Fig. 2).
Outlook on the web:
Calendar delegation in Outlook on the web
Manage someone else's calendar in Outlook on the web
Outlook for Windows:
Manage another person's mail and calendar items
Allow someone else to manage your mail and calendar
Outlook for Mac:
Share your calendar in Outlook for Mac
Become a delegate or stop being a delegate in Outlook for Mac
Add and manage delegates in Outlook for Mac
|

Please note:
- The calendar owner can additionally give delegates access to private events (Fig. 1).
- 'People in my organization' is a standard user created by our UZH administrators. This refers to all persons presend in the UZH Directory (i.e. Active Directory).
- Should something not be displayed properly, please refresh your browser window, delete your browser cache or remove other calendars and add them to your calendar list again.
|

- Email with permission information:
Button accept -> Calendar is added to calendar list
Button show calendar -> Opens the calendar.
After accepting, the button automatically switches from accept to show calendar and, after clicking it again, back to accept.
You can also send sharing invitations to external persons with non-UZH address. The authorized person will receive a html-, ics- and webcal-link to your calendar in his invitation email, so that he can embed your calendar as a subscribed calendar or display it in a separate browser window. Attention. Please note that if you share your calendar with external people, the link can be shared with other people as well ... without the knowledge of the person who shared it. Consequently, after a release withdrawal no one has access via this link.
26.) Email recovery
Q: How can I recover a deleted email?
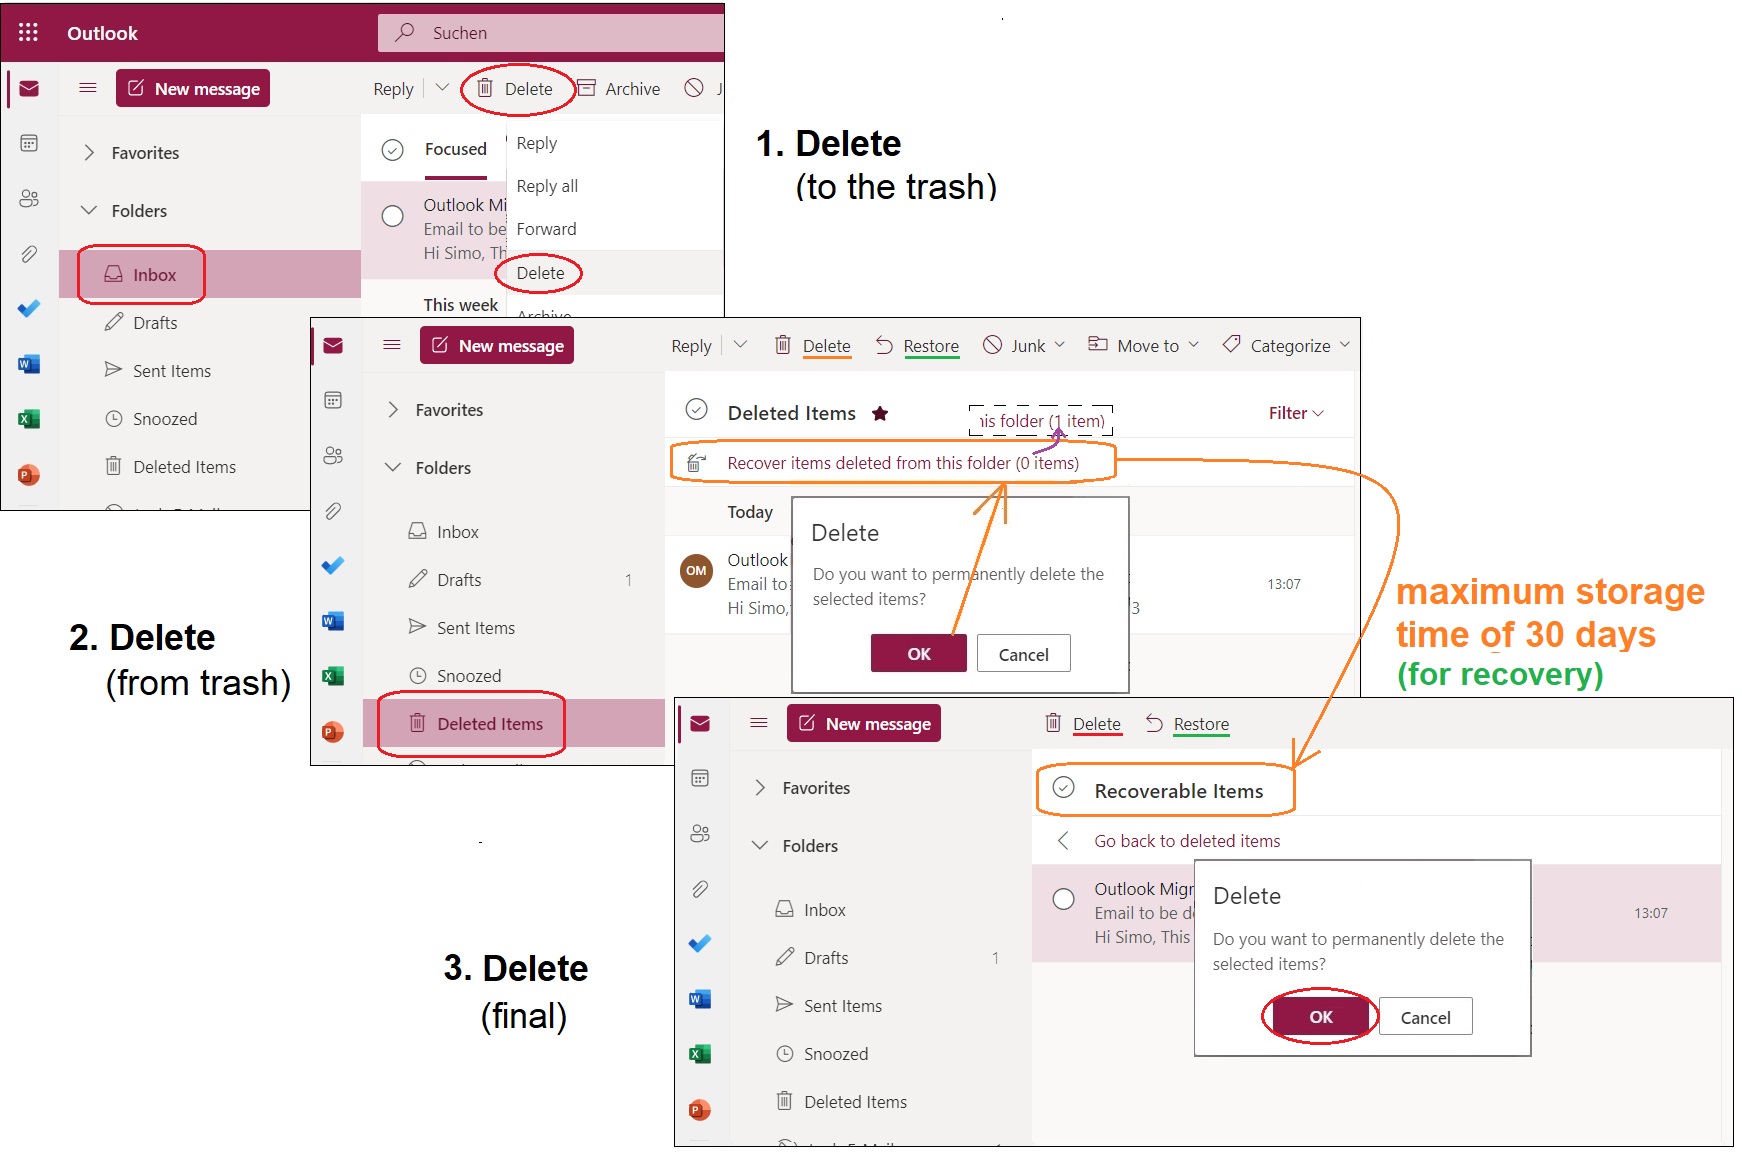
A: The deletion process is identical for both Outlook on the web and Outlook for Windows.
- If you delete an email, it will be moved to the Trash (Deleted Items folder).
- If you delete an email from the trash, it will be moved to the (directoryless) Recoverable Items folder (see figure). It will remain there for a maximum of 30 days.
- If you delete an email from the Recoverable Items folder or if the retention period expires, it can no longer be recovered (not even by our administrators).
|

- The Recoverable Items folder appears in the Outlook Desktop version as a separate 'Recover deleted items (from server)' dialog box.
- An email deleted via SHIFT + DEL ends up directly in the Recoverable Items folder.
- Folders deleted from the Trash are no longer recoverable, the messages contained therein however are. They will end up in the folder Recoverable Items and can be moved back to a still existing folder via the "Move" command.
- Notable commands/options in Settings (Outlook on the web):
- Empty deleted items when signing out: Mail > Message handling.
- Include deleted items while searching all folders: General > Search.
- In Outlook for Windows, see Options > Advanced or Search.
Outlook on the web:
Recover deleted email messages in Outlook on the web
Restore deleted contacts in Outlook on the web
Outlook for Windows:
Recover deleted items in Outlook for Windows
Empty the Deleted Items folder in Outlook
Outlook for Mac:
Recover deleted items in Outlook for Mac using Exchange/O365
Recover deleted folders in Outlook for Mac
27.) Access to other folders
Q: How can I give other users access to my folders?
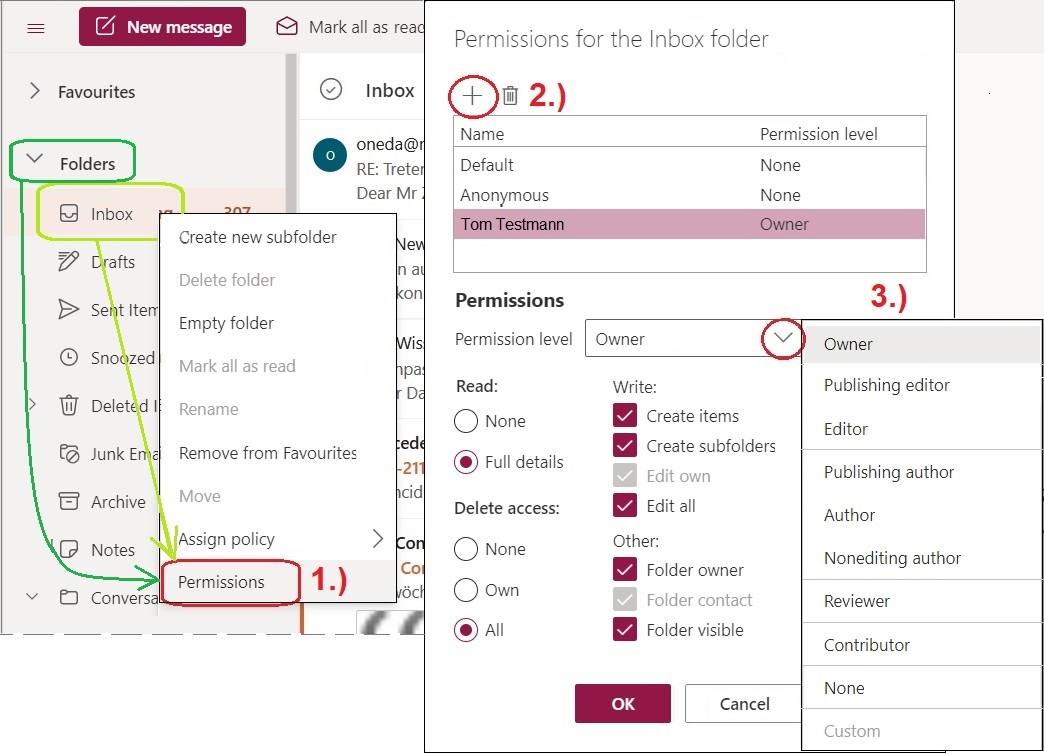
A: Outlook on the Web
- Call context menu command Permissions from directory Folders (root folder).
- Click on plus icon and add person to be authorized.
- Select the desired permission level and click OK.
- Repeat the same steps for the desired (sub-) folder to be shared.
|

The authorized person adds the shared folders to himself as follows:
- Call context menu command Add Shared Folder from directory Folders (root folder).
- Find the user whose mailbox (folder) you want to access and click Add.
|

- To remove permissions from a user, please click at step 2 (Fig. 1) on the ...
Trash icon (to the right of the plus symbol). - To remove an added mailbox, at the mailbox to be removed click on the context menu command ...
Remove shared folder (Fig. 2). - When trying to open an unauthorized mailbox, Outlook on the Web displays the message ...
"You may not have permission to perform this action."
In Outlook for Windows or for Mac, the message appears ...
"The folder cannot be expanded. A client operation failed." - Only after at least the root folder has been shared, the permittee can manually add the mailbox on their end and view the shared folders.
- Folder access rights are synchronized between Outlook on the Web and Outlook for Win / Mac.
- Added shared folders are not automatically displayed (added) in other Outlook clients.
- MS Support page: Access another person's mailbox
Outlook for Windows:
- Delegate access rights to own folders:
Top Folder (Root Folder):
Context menu command Folder Permissions > Permissions tab.
Subfolders:
Context menu command Properties > Permissions tab.
- Add shared mailboxes manually (if not displayed automatically):
Root folder:
Context menu command Data File Properties > General tab > Advanced button > Advanced tab.
Outlook for Mac:
- Share access permissions to own folders (no matter if root or subfolders):
Context menu command Sharing Permissions > Permissions tab > Add User button > Add button > OK
28.) Email quarantine (MS 365 Defender)
Q: Is there an email quarantine for the user?
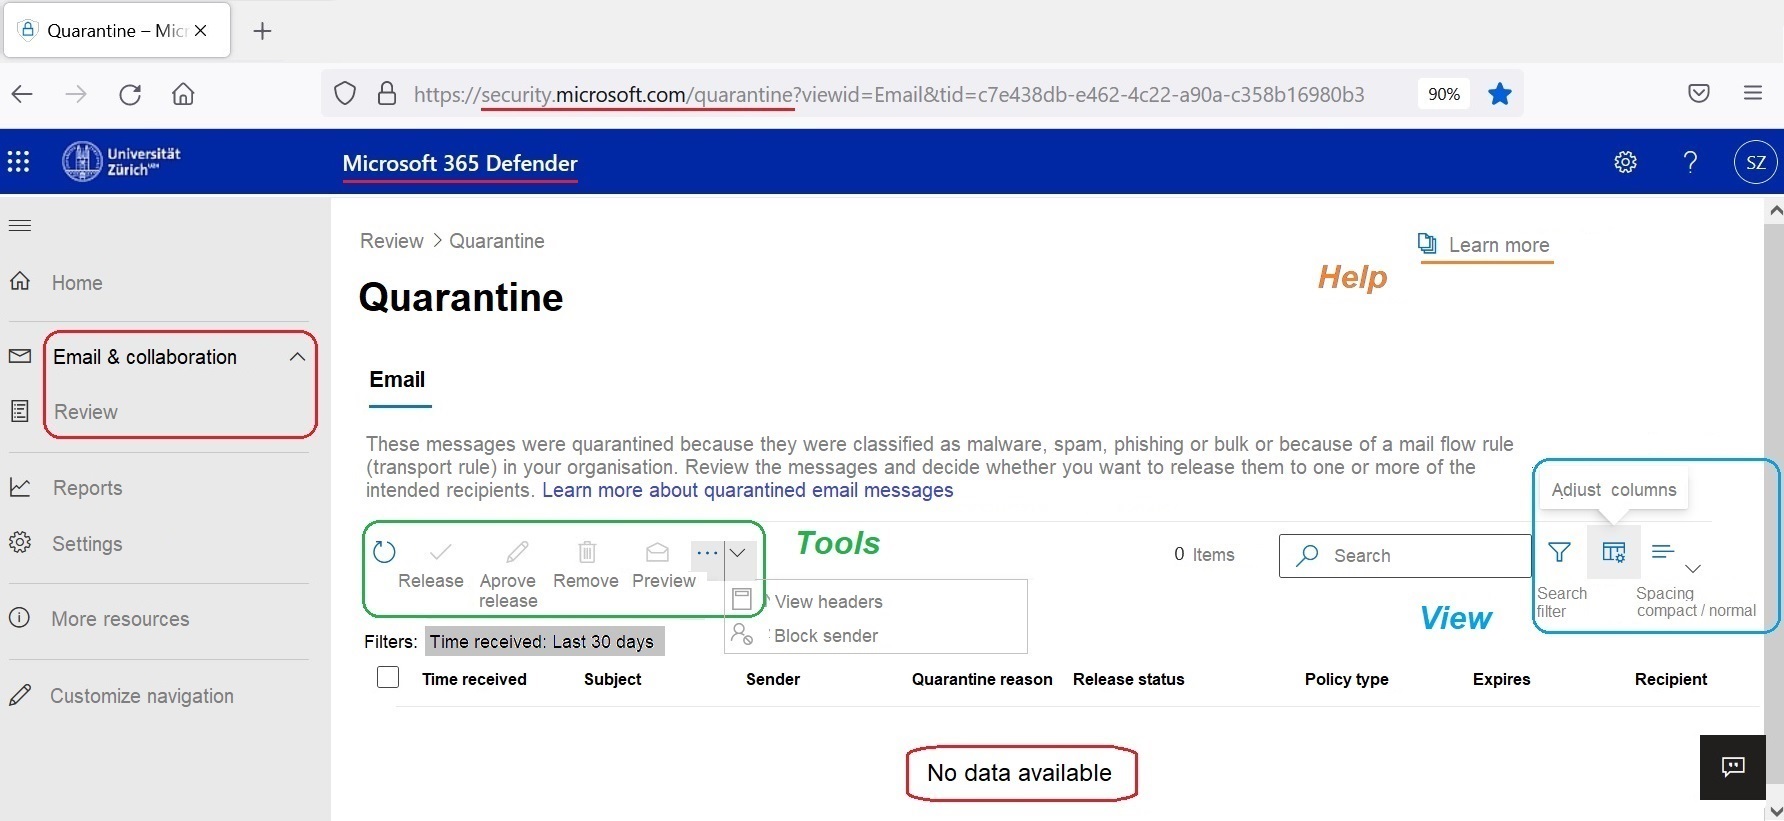
A: Yes. Microsoft 365 Defender (https://security.microsoft.com) is an enterprise defense suite designed to protect against complex attacks. It enables a complete determination of the threat potential.
|

Administrators can define quarantine policies, what users can or cannot do with quaranined messages. Currently you have the possibility to preview (including message headers), block, unblock or delete them (see Tools in the figure). Blocking means that the emails no longer end up in the inbox, but in the quarantine (analogous to 'blocked' junk mails, which are moved to the junk folder). This is done client-independently, so the rules work the same when using different clients.
Find and release quarantined messages as a user in EOP oder ...
Block a mail sender oder ...
Phishing and suspicious behaviour.
- Messages isolated as malware, phishing with high trustworthiness or as a result of message flow rules (transport rules) are seen by default only by administrators (IT-Security).
- Isolated spam, bulk or phishing emails (without high trustworthiness), on the other hand, are also editable by the user.
The email protection itself is provided by Defender through administrator-configurable security / threat policies (e.g. anti-spam policy, anti-malware policy, anthiphishing policy, etc.). The threat protection features are included in all Microsoft 365 subscriptions. You can find which protection feature is offered via which subscription listed at ...
Protect against threats or ...
Microsoft 365 Defender - die vordefinierten Sicherheitsrichtlinien (de, Video).
For getting started instructions on Defender, go to ...
Get started with Microsoft 365 Defender or ...
Quarantined email messages in EOP and Defender for Office 365.
Emails that have been sent to shared mailboxes (ex mail-ins) and have ended up in quarantine can be checked in the (own) quarantine of the authorized users. They can be found via the search field, filtering by recipient address (funnel icon 'Filter') or clicking on the Recipients column to sort by messages sent to the shared mailbox. See blue box View in the figure and also ...
View and release quarantined messages from shared mailboxes
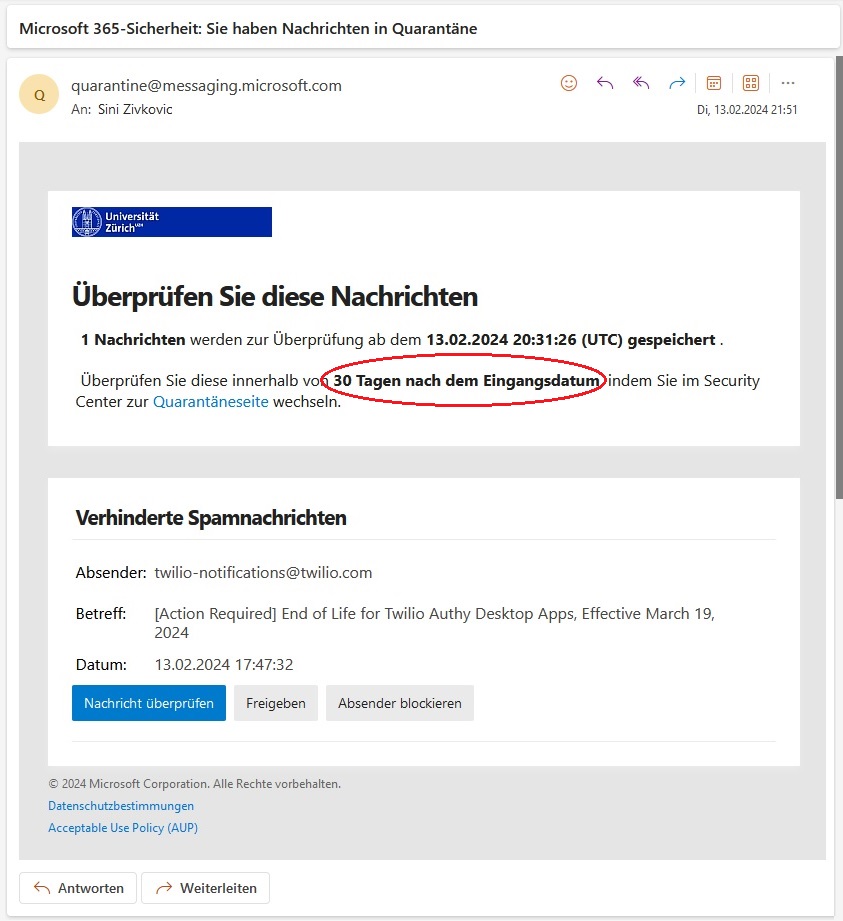
Messages that remain unprocessed in the quarantine are deleted after a defined period of time (30 days (JPG, 141 KB)). First and foremost, it is important that you release the messages that do not belong in the quarantine before they are deleted (so-called false positives).
For those interested and for product differentiation: MS Security- and Management Tools (en) (PDF, 852 KB).
29.) Rights delegation for shared mailboxes
Q: How can I get access rights to shared mailboxes?
A:
1.) In most cases, the IT manager designates the mailbox owners in the coordination catalog.
These are then given full access to the shared mailbox and can open it.
2.) Opening the shared mailbox:
- Outlook on the Web: Open Another Mailbox Command at Account Manager.
(siehe FAQ 14 und Abbildung unten)
- Outlook for Windows / Mac: See FAQ 14.
3.) The owners can now, according to FAQ 27, Delegate access and permission level to folders.
-

- Zoom (JPG, 42 KB)
-
Abb.: Outlook on the Web: Open another mailbox
(Click on the magnifying glass icon to enlarge.)
Note:
- If you are not the owner of a shared mailbox, you will receive a message of the type "AccessDeniedException" when you try to open it in Outlook on the Web.
- Your shared mailboxes may be managed exclusively at the level of the coordination catalog, without delegating access rights on the level of Outlook. If you are unsure, please contact your IT manager.
30.) Roles and activities for institute objects
Q: Who can do what and where with the shared mailboxes, groups and resources?
A: The IT manager has the task ...
... to nominate additional persons* as IT managers via the mutation form (ger).
- Only IT managers have access to the coordination catalog.
(* External persons should have been recorded in ISIM as manually managed persons.)
... to manage all institute objects and its owner in the coordination catalog (ger):
- Create / modify / delete shared mailbox.
- Select shared mailbox owners (persons / groups).
- Automatically (do not) display shared mailbox for owners (de- / activate automapping).
- Enable / disable shared mailbox for "SMTP-Auth without MFA".
- Enable / disable shared mailbox for "Send As".
- Add remarks to the shared mailbox.
- Create / modify / delete group.
- Select group owner (persons / groups).
- For rooms / resources additionally specify metadata and select booking process.
- Write down comments about the group, the room and the resource.
- Grant the 'Editor' access right to room / resource calendars.
Notes:
- The IT manager does not automatically have access to the contents of a shared mailbox.
Automatic access to all folders / calendars of a shared mailbox is available only to its owners.
If required, the IT manager can appoint himself as the owner. - The IT manager is responsible for coordination within his own organization
(e.g., adherence to naming conventions). - The IT officer is responsible for compliance with UZH / ZI requirements.
(e.g., compliance with REIM or not using shared mailboxes as a person).
The owner has the task ...
... to manage the content, folder and calendar access rights for shared mailboxes and
to manage the memberships for groups & rooms (resources) via Outlook (Webmail):
- Open and edit shared mailbox (full access) (FAQ 14).
- Shared mailbox (do not) display itself (automapping, Outlook for Windows only) (FAQ 14).
- Assign shared mailbox folder / calendar access rights (analogous to personal mailbox (FAQ 26 / FAQ 24)).
- Send on behalf / name of the shared mailbox (Send on Behalf / Send As).
- Add / remove group members (also via PowerShell).
(Owner groups can currently edit memberships only in Outlook for Windows.) - Release room / resource booking on request.
All others can via Outlook / Webmail ...
- add (view) shared mailbox folders / calendars (FAQ 26 / FAQ 24),
- search in the global address book for shared mailboxes (All Users), groups (All Distribution Lists) and rooms (All Rooms).
Helpful additional information (recommendations, limitations, calendar permission): UCC2022-KK-RollenRechte_Apr2023 (ger) (PDF, 110 KB).
31.) Group members / Distribution groups
Q: How and where can I manage the members of Microsoft 365 (distribution) groups?
A: The group owner can maintain the group members in the Outlook settings:
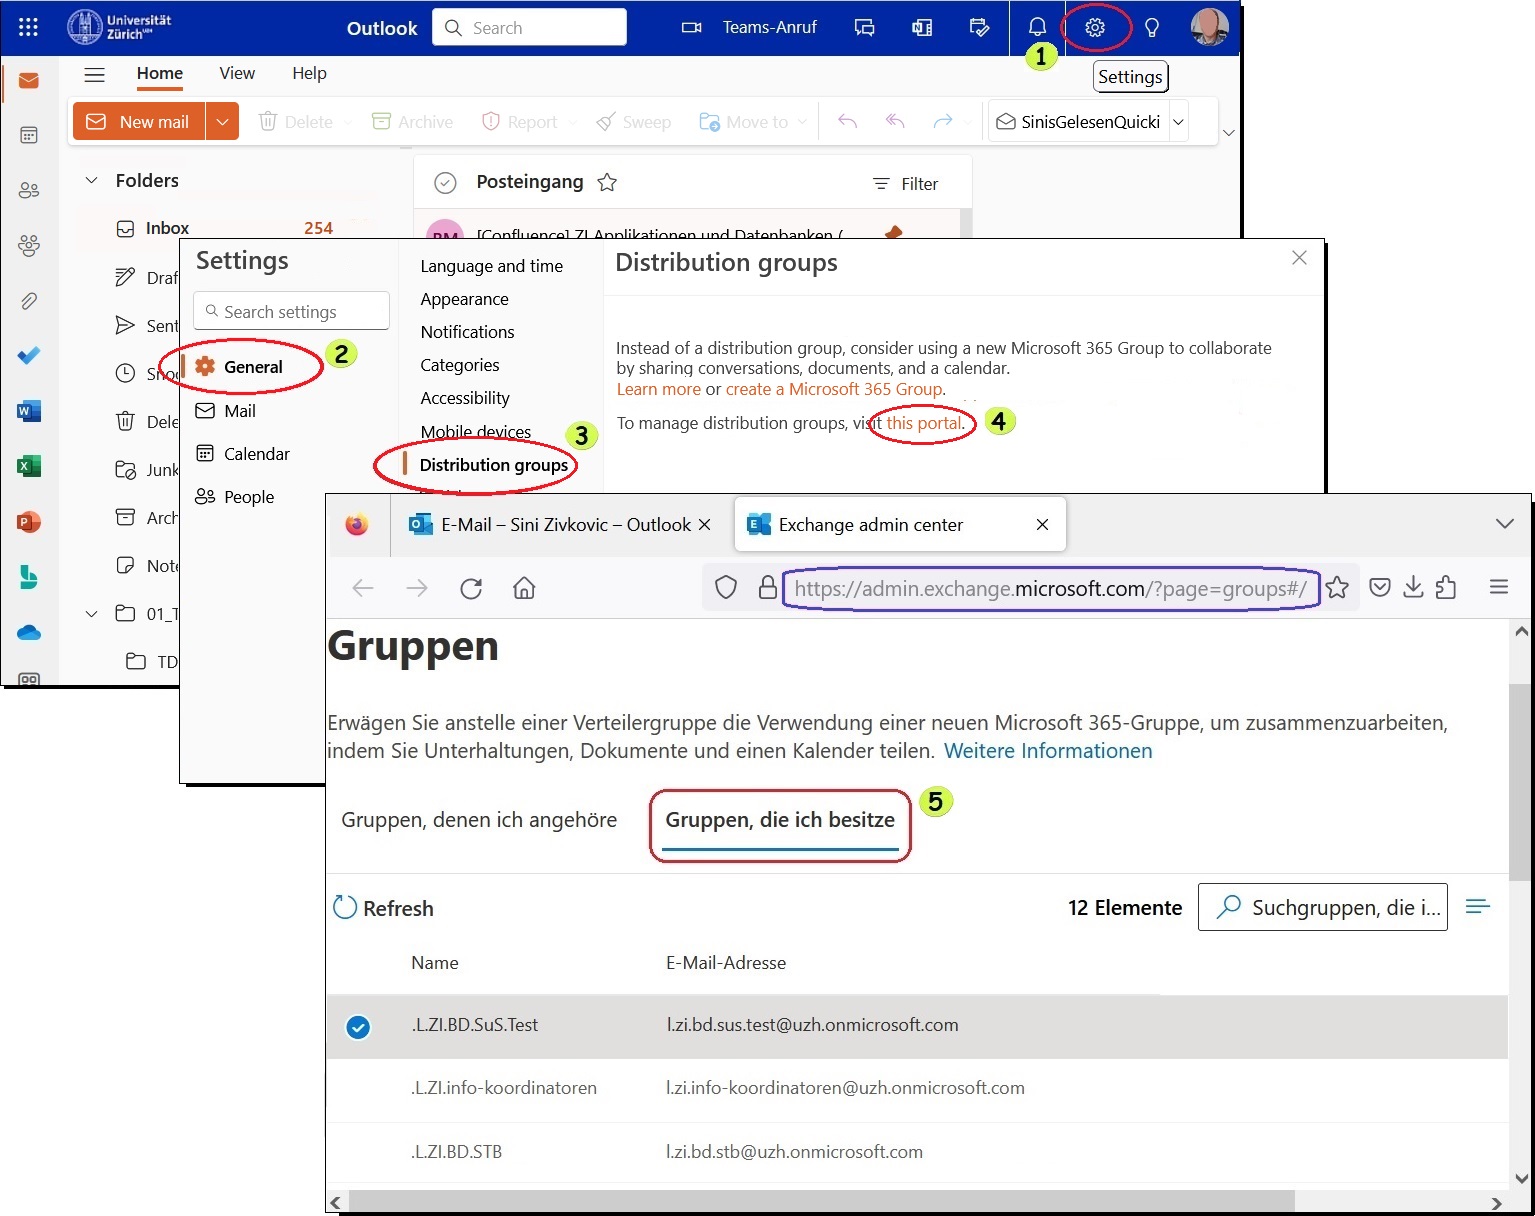
Outlook on the Web:
Please click at the top right of the toolbar on ...
1.) Settings (gear icon)
2.)'General' tab > 3.) 'Distribution groups' tab
4.) Link 'This portal' > 5.) Tab 'Groups I own'.
|

Alternatively, you can access the overview page directly via Link .
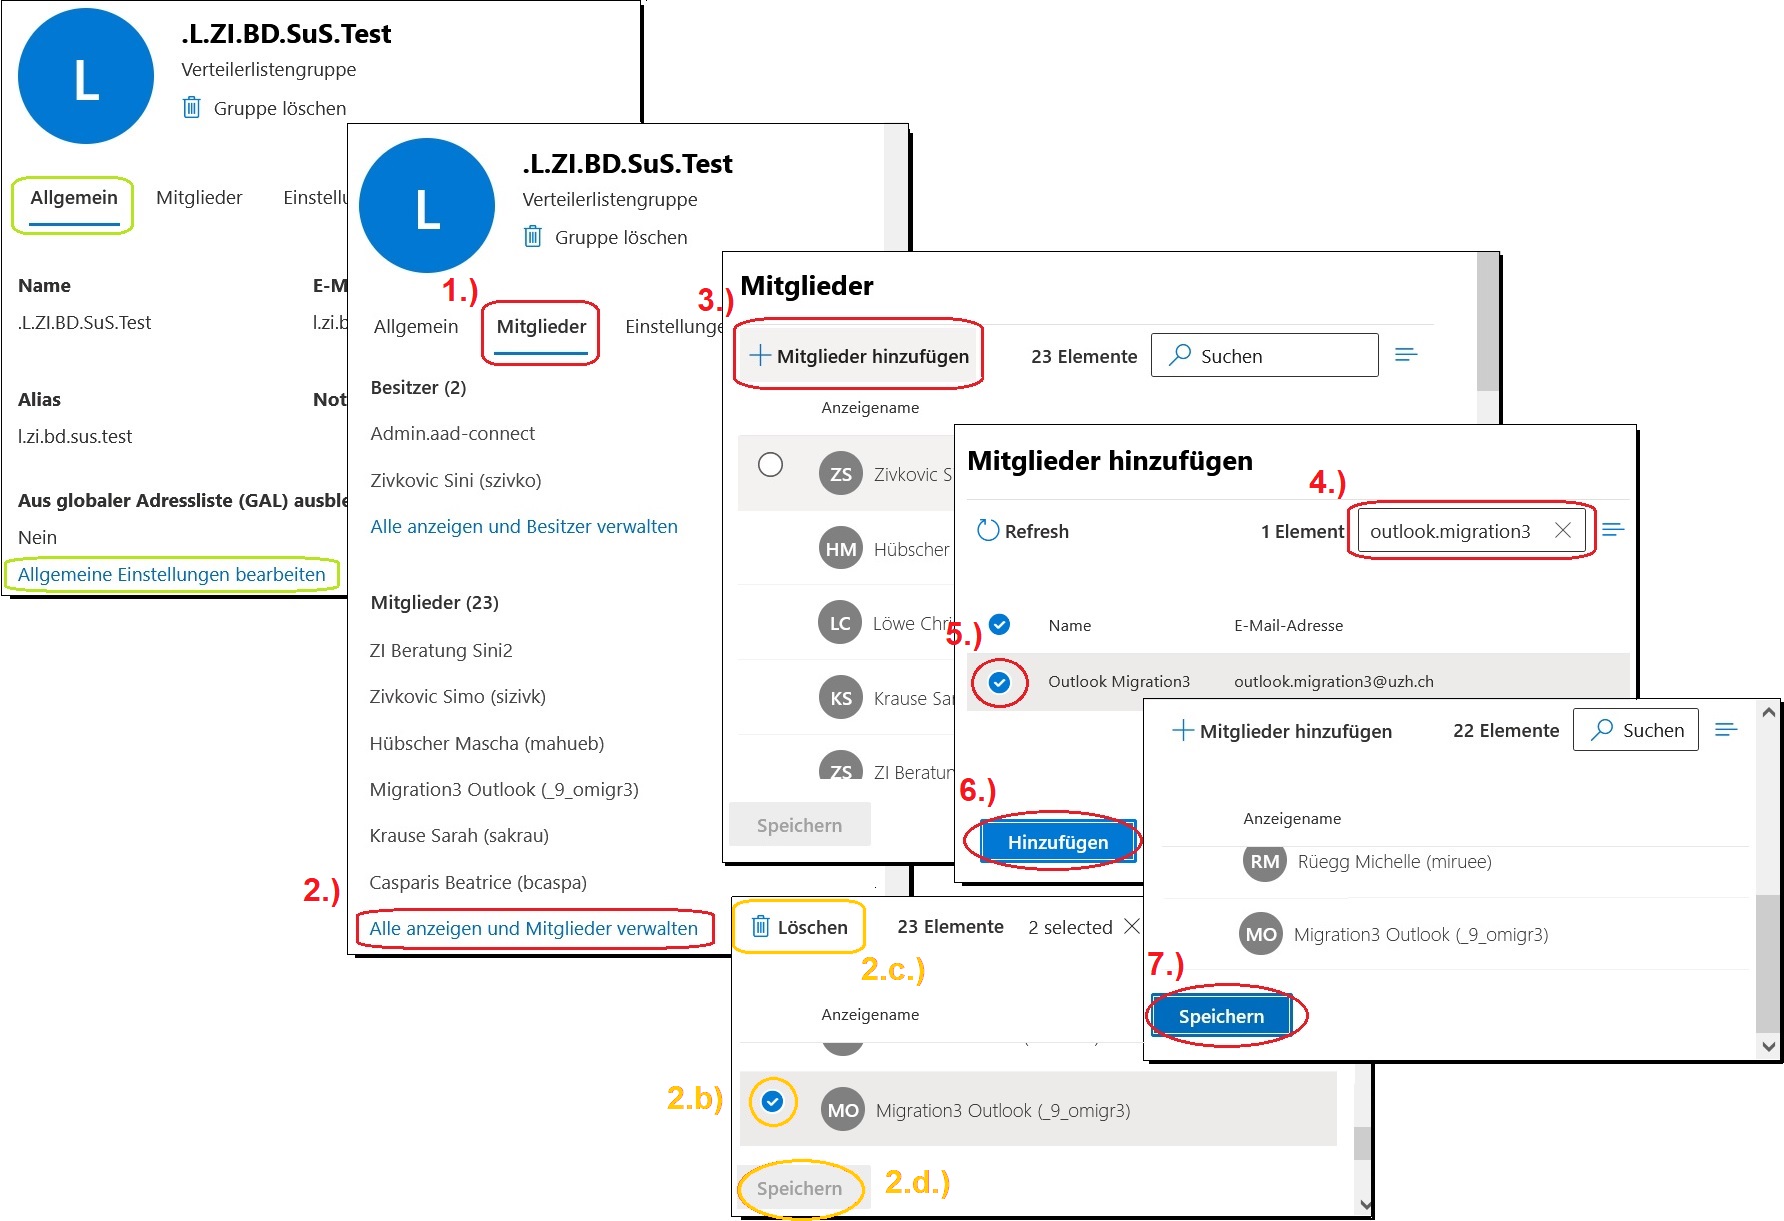
To add or delete members, select the group and click on ..
1.) Tab 'Mitglieder'
2.) Link 'Alle anzeigen und Mitglieder verwalten'
3.) Button '+ Mitglieder hinzufügen'
4.) Search for the desired member via search field
5.) Select desired member from search results
6.) Button 'Hinzufügen'
7.) Button 'Speichern'.
|

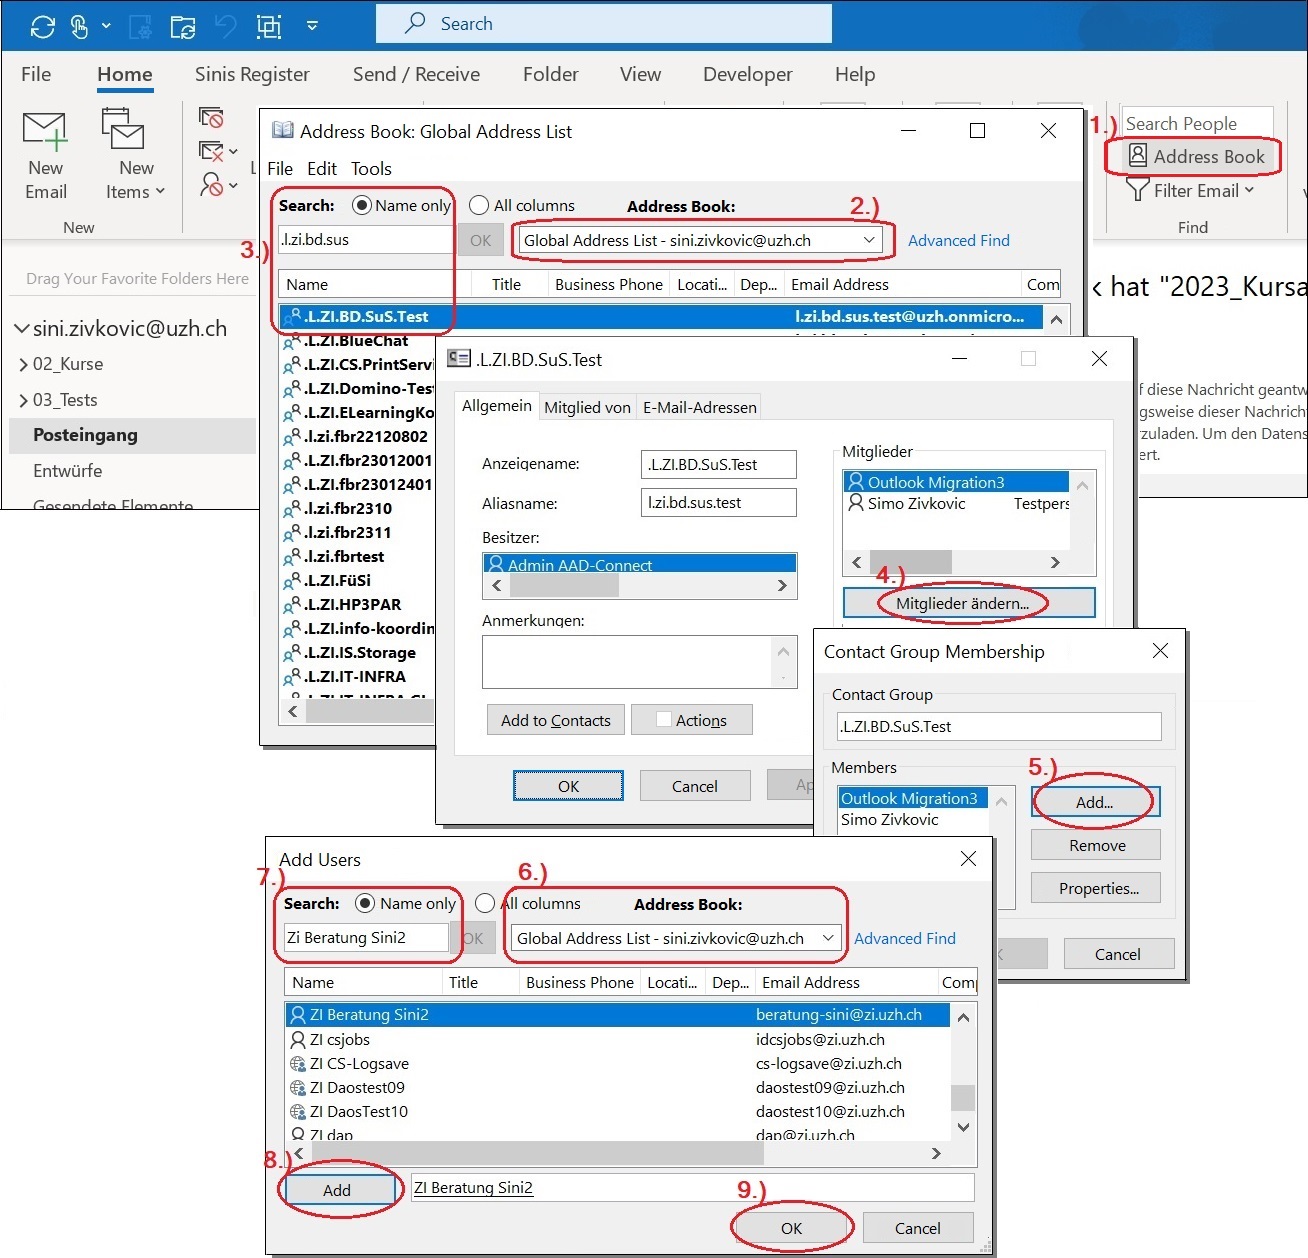
Outlook for Windows:
Please click in the menu section 'Search', on ...
- (1) Adress book > (2) Select address list > (3) Search and open group (double click)
- (4) Button Change Members > (5) Button Add
- (6) Select adress list > (7) Search and (8) add person
- (9) Confirm all dialog windows with OK.
|

Notes:
- A member mutation made in Outlook on the web is immediately displayed in Outlook for Windows and vice versa.
- Microsoft 365 groups are created by the IT manager in the coordination catalog.
- Please do not confuse distribution groups with the personal distribution list (contact list), (see FAQ 23).
- The address list to be displayed first in the address book can be defined in the address book itself via the menu command Tools > Options > When opening the address book, show this address list first
(e.g. select Global Address List or All Distribution Lists). - When searching for a group, please do not forget to specify the dot preceding the group name (for example '.l.zi.bd.sus' and not 'l.zi.bd.sus').
- The group properties (name, address, domain and visibility of a group) are editable in Outlook on the Web in the respective group tab 'General' and under the link 'Edit general settings' (Fig. 2).
32.) SMTP and IMAP variants at UZH
Q: What are the basic sending and receiving options at UZH?
A: Information about receiving and sending methods can be found here:
-> Table (only in german) IMAP- & SMTP-Varianten (PDF, 166 KB)
Hints:
Coordination Catalog
(Only IT managers can create and delete shared mailboxes).
Directive (bulk) sending
33.) Manage personal data
Q: Where can I manage my personal data?
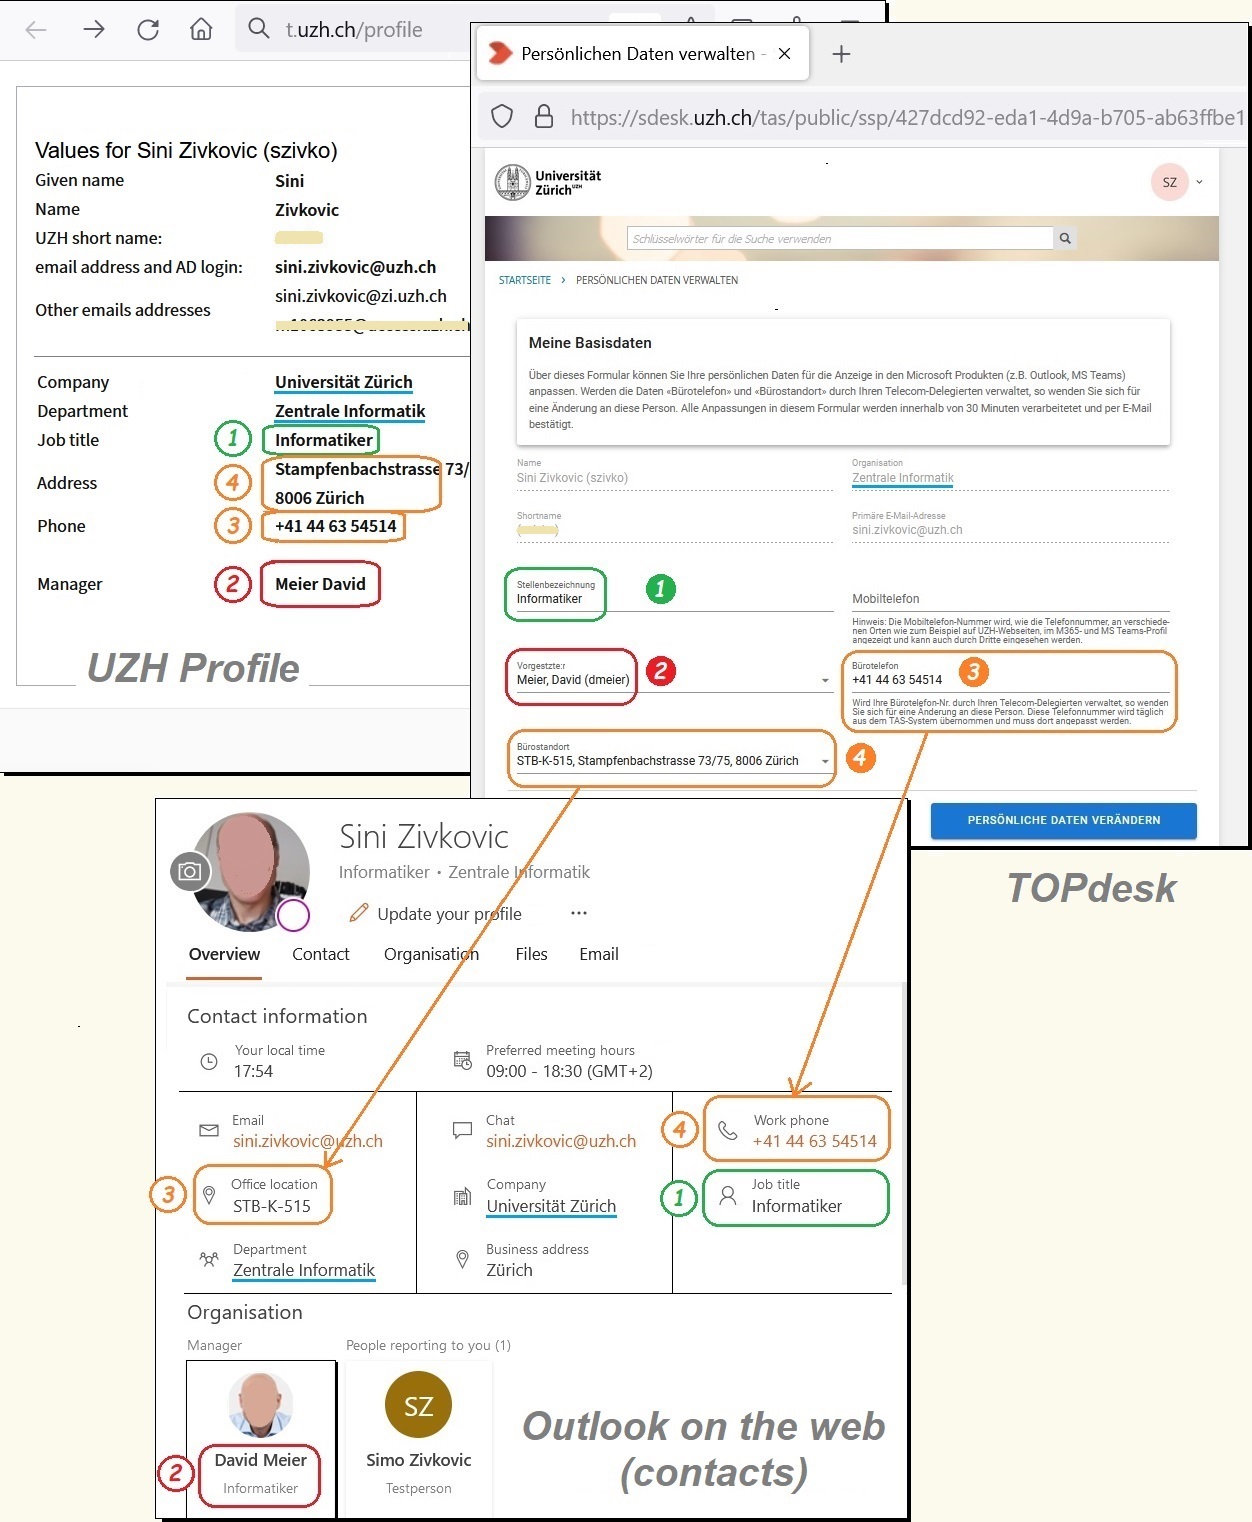
A: In the Exchange environment you can manage your personal data ...
a.) via the Tiny-URL t.uzh.ch/profile (German: t.uzh.ch/profil),
b.) view in the contacts of Outlook (on the web) and ...
c.) edit in TOPdesk: 'Self Service Portal' > tile 'Manage personal data' > button 'Change personal data'.
|

Hints:
- Supervisor:r (2): By entering a person in this field, the organizational structure is built and displayed in the profile of the office products.
- Office Phone (3) and Office Location (4): If managed by your Telecom Delegate, contact them to make a change. A change of this data in this form will be temporarily applied, but will be overwritten by the original data the next day.
-
Cell phone: Number is displayed in various locations, possibly also viewed by third parties.
-
Adjustments in this form will be taken over within 30 minutes, but will only be displayed in this form after the end-of-day processing on the next day.
-
Grayed out data is for informational purposes. For adjustments to this data, please contact your IT representative(s).
34.) Manage storage space for MS365 apps
Q: Where can I see my memory usage?
A: Please execute the following commands in the settings of the respective application (OneDrive, Sharepoint, Outlook).
OneDrive (web version):
- Home > Settings (gear icon, top right) (1) > 'OneDrive setting' link (2) > 'More settings' link (3) > 'Storage metrics' link (4) (see illustration)
OneDrive (desktop version, Windows):
- OneDrive icon in taskbar > Settings (gear icon, top right) > context menu command 'Settings' > section 'Storage' (bottom left), ...
alternatively ...
- Go to the 'OneDrive - UZH' directory in File Explorer > 'Settings' context menu command > 'Storage' section (bottom left)
Sharepoint:
- Start page of your team (not of the UZH) > Settings (gear icon, top right) > 'Site information' link > 'View all site settings' link > 'Storage Metrics' link.
Outlook on the web:
- Settings (gear icon, top right) > 'Account' tab > 'Storage' tab
|

At UZH, you currently have a standard limit of ...
- 100 GB resp. 25 GB per user (member, resp. student) for your data on OneDrive.
- On Sharepoint it is 50 GB per website (team) and ...
- in Outlook (on the web) 100 GB per user (mailbox).
Please note:
- Your personal data is stored on OneDrive.
- When you leave UZH, your OneDrive data will be completely deleted.
- Storage extensions are not provided. - Your UZH-relevant (team) data is stored on SharePoint.
- Your SharePoint data is retained even if you leave UZH.
- Storage extensions (50, 100, 250, 500, 1000 GB) are possible (via ticket).
35.) Sending a Mail Merge from a Shared Mailbox
Q: How do I send a mail merge with an impersonal sender address?
A: Please check the following requirements and carry out the following steps in Microsoft Word in the 'Mailings' tab.
Alternatively, you can find more detailed step-by-step instructions here:
Create Mail Merge (Windows & Mac) (in german) (PDF, 2 MB).
Prerequisites:
- Windows 10 & 11, MacOS 13 & 14
(Attention: The latest operating system updates must be installed.) - An Outlook profile (see FAQ 17 'Profiles') only exists with the mail account of the shared mailbox.
- The shared mailbox is defined as the default mailbox in Outlook.
- The mailbox property“ Authorize ‘Send As ’” is activated (can be set by the IT manager).
- Outlook must be opened beforehand to send the form letter
Register 'Mailings':
- Menu command 'Start Mail Merge' > 'Email messages'.
- Menu command 'Select Recipients' > 'Use existing lists'.
- Select Excel address file > Click 'Open' button.
- If required, activate the checkbox 'First data row contains column header' .
- Select table > Click 'OK' button.
Select the desired field position in the Word document with the mouse: - Menu command 'Insert Merge Field'.
- Select fields (depending on the Word version, also click on the 'Insert' button.) - Menu command 'Finish and Merge' > 'Merge to Email'.
- 'Message options':
> To: 'EMail'
> Subject line: 'Empfangsbestätigung'
> E-Mail format: 'HTML'
- Click on the 'Email Merge to Outbox' (or 'OK') button.
|

- If the e-mail does not arrive formatted as desired, please check the e-mail format (HTML or text in step 4).
- As an alternative to the four step sequences above, you can be guided by the 'Mail merge wizard'. To do this, select the entry 'Mail merge wizard with step-by-step instructions' in step sequence 1 instead of the submenu command 'E-mail messages'.
36.) Automatic Archiving and In-Place Archive (Online Archive)
Q: How does automatic archiving work in Outlook?
A: In-Place Archive (Online Archive)
The In-Place Archive is an additional archive mailbox in Outlook. It is used to automatically move older emails out of the main mailbox. The emails remain preserved, searchable and subject to the defined archiving and deletion policies.
Notes:
- The archive appears as a separate mailbox:
- "In-Place Archive – Your Name" (new Outlook/Web)
- "Online Archive – Your Email Address" (classic Outlook/Mac)
- Archiving takes place entirely in the cloud (no local files).
- Default size: 100 GB (expandable up to 1.5 TB upon request).
- An online connection is required to search the archive.
Automatic Archiving
Automatic archiving is available for users with an enabled online archive.
- When mailbox usage reaches approx. 96%, older emails are automatically archived.
- Emails can also be moved to the archive manually.
Limitations:
- Shared mailboxes do not have an archive by default (upgrade to A5 required).
- A1/EMS users do not have an archive (upgrade to A5 required).
- A5 license (faculty and students): archive mailboxes are included.
Deletion Policies
Deletion policies always apply to the email itself, regardless of its storage location.
Example: An email with the policy "delete after 1 year" will be deleted — whether it is in the primary mailbox or in the archive.
Typical process:
- Email is received
- After a defined period → moved to the archive
- After a further period → automatically deleted (depending on the policy)
Difference: Archive Folder vs. In-Place Archive
| Feature | Archive Folder | In-Place Archive |
|---|---|---|
| Type Storage Purpose Automation Visibility |
Regular folder Same mailbox Manual filing No Folder list |
Separate archive mailbox Separate storage Long-term archiving Yes (with policies) Separate mailbox |
Important: The online archive is not the same as the standard “Archive” folder in Outlook.
Further information
Managing Email Storage with In-Place/Online Archive Mailboxes