Migration to Citrix - New
Table of contents
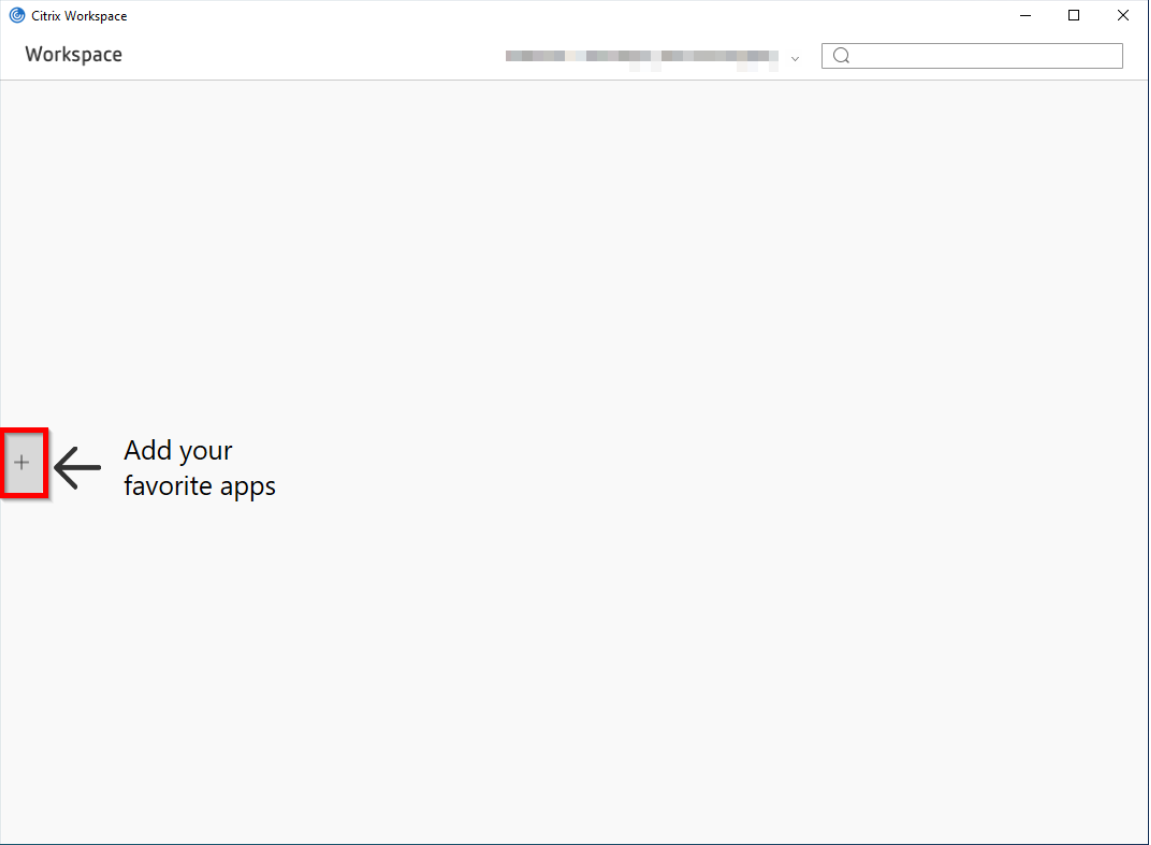
Add 'Citrix New'
- Open the 'Citrix Workspace App'.
- Click on the '+' on the left to open the menu where you can view all your Citrix desktops.
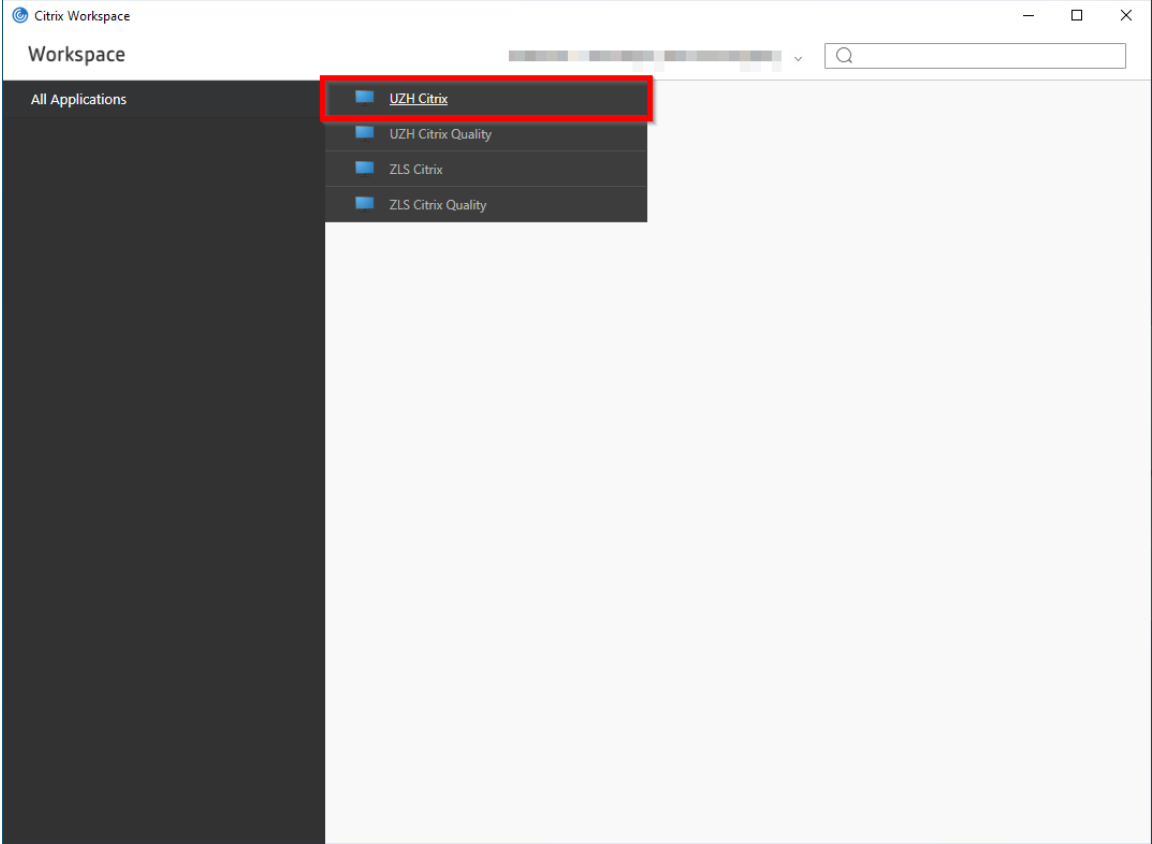
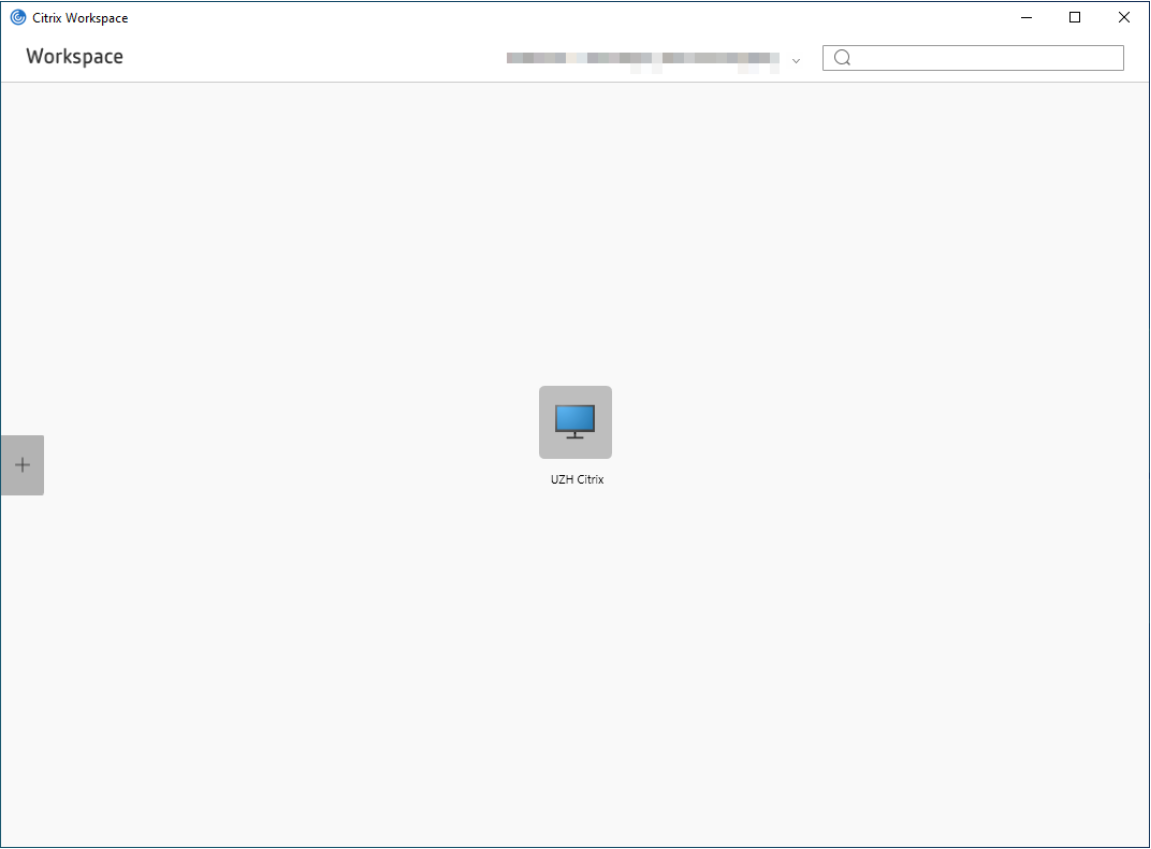
- If you click on 'UZH Citrix New' in this menu, the new environment will be added to the home page of the Workspace window.
If the 'UZH Citrix New' option is not available, please open a ticket with the Service Desk. -
Clicking on the 'UZH Citrix New' environment in the workspace, the new environment can be launched.
Take over connected network drives
To be able to transfer the connected network drives to the new environment, take the following steps:
Note down the old drives and mount them again
-
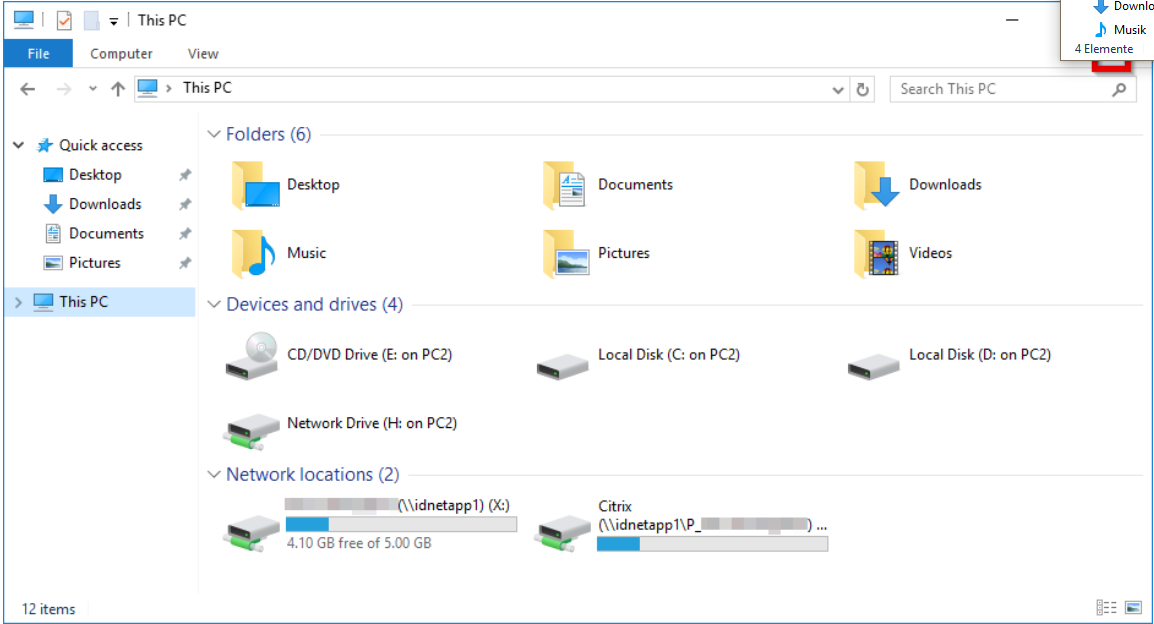
Open the 'Old Citrix'.
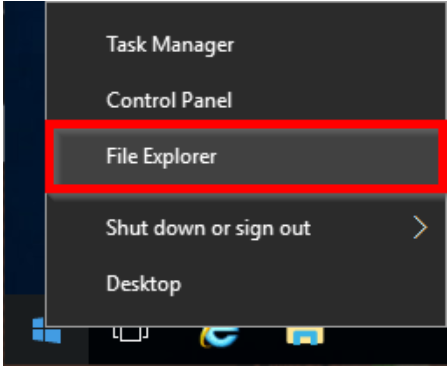
-
Right-click on the Windows logo and then click on 'Explorer'.
- In the tab 'This PC' you will find your network drives in the section 'Network addresses'. Now write down the network addresses, the path is needed in the new Citrix afterwards (example: \\servername\share$).
-
Open the 'new Citrix'.
-
Open the 'Explorer'.
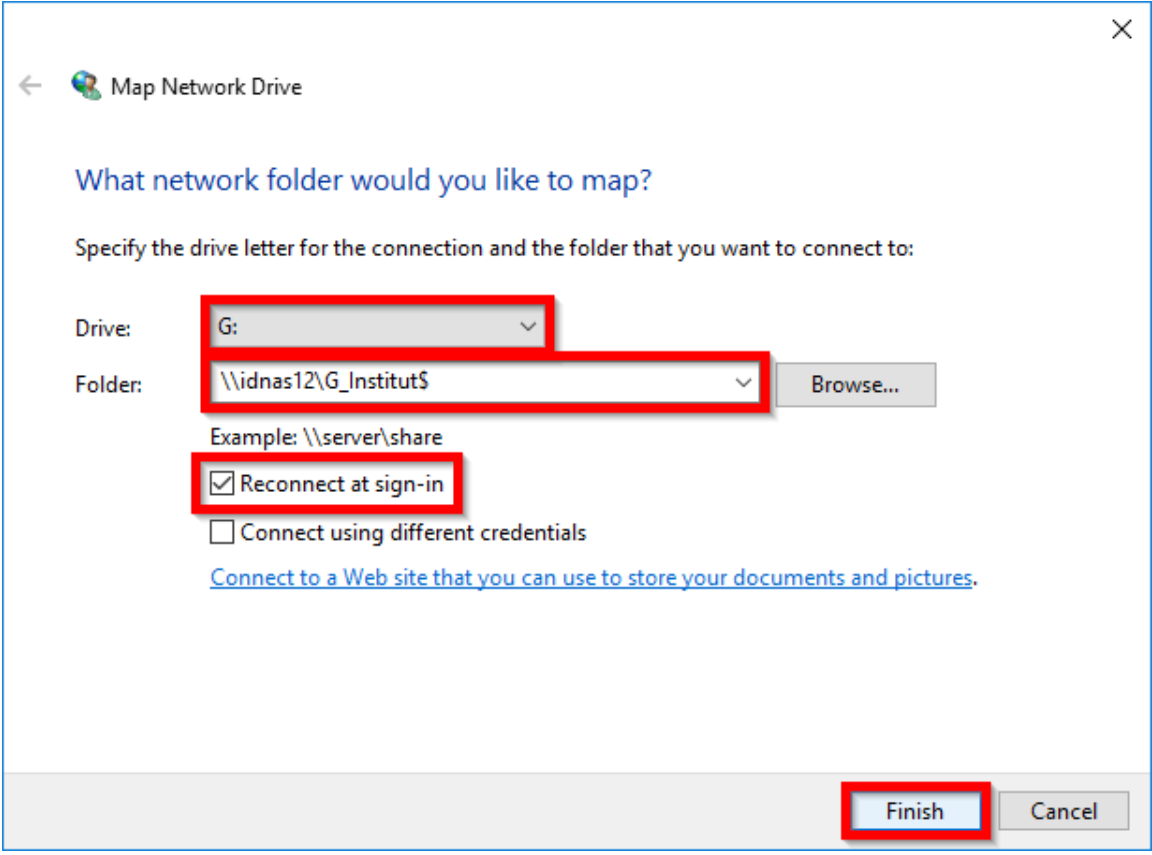
- In the bar at the top, click 'Computer' and then on 'Connect network drive'.
- Select a drive letter and type in one of the noted paths (from the old Citrix).
- After that click on 'Complete'.
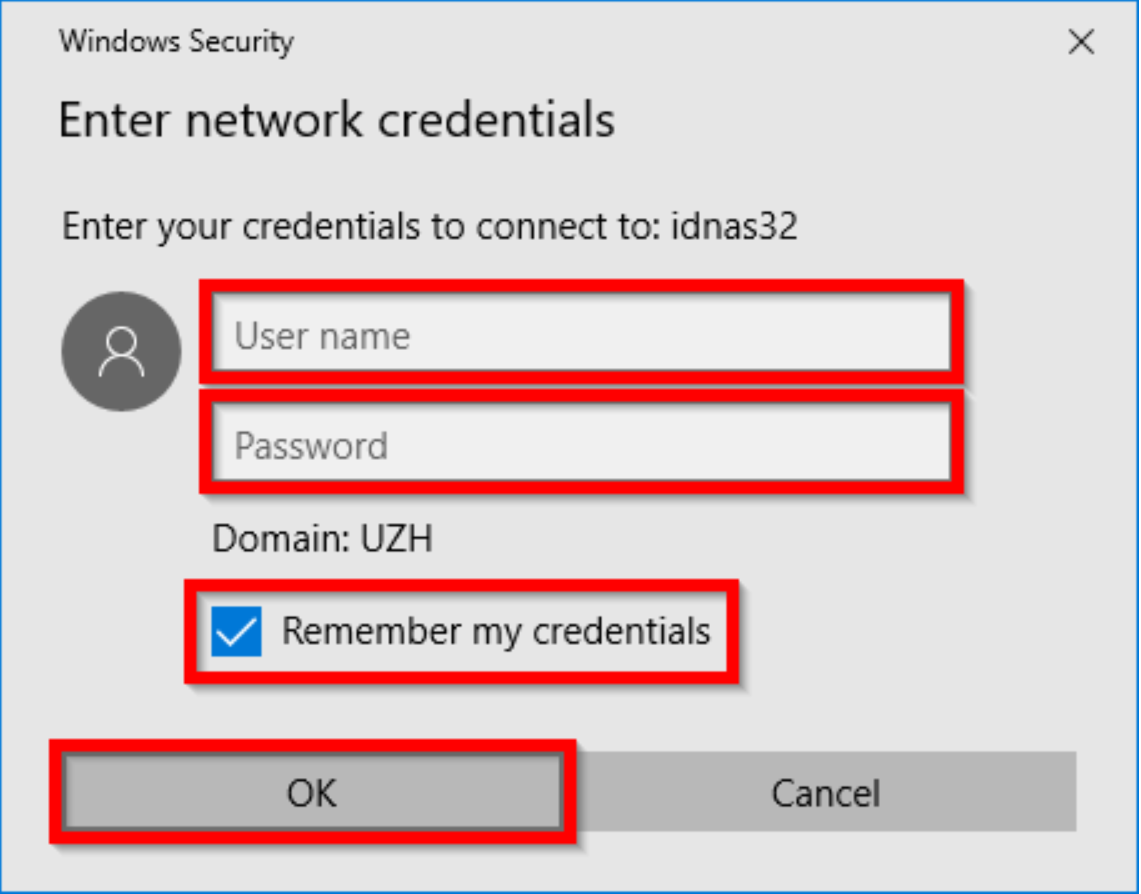
- If necessary, log in with your network credentials.
- After that, your network drive will be displayed under 'Network addresses' in the explorer.

You should now perform these steps for each network drive that was not added automatically.
Take over connected printers
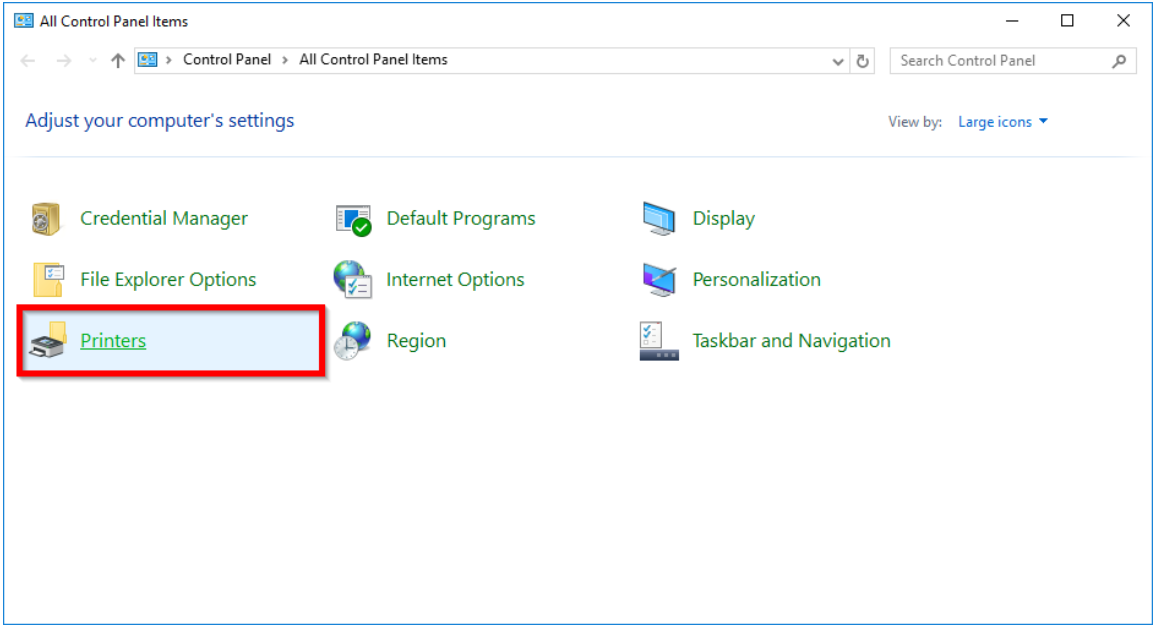
- Open the 'old Citrix'.
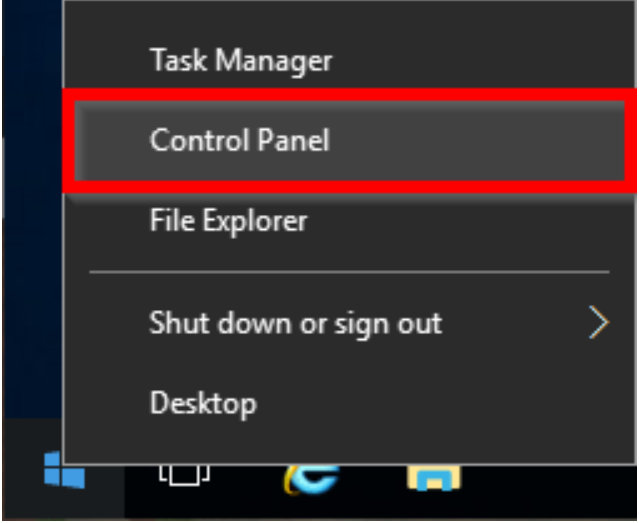
- Right-click on the Windows logo and then click on 'Control Panel'.
-
- In the window that appears, start the system control element 'Printers'.
-
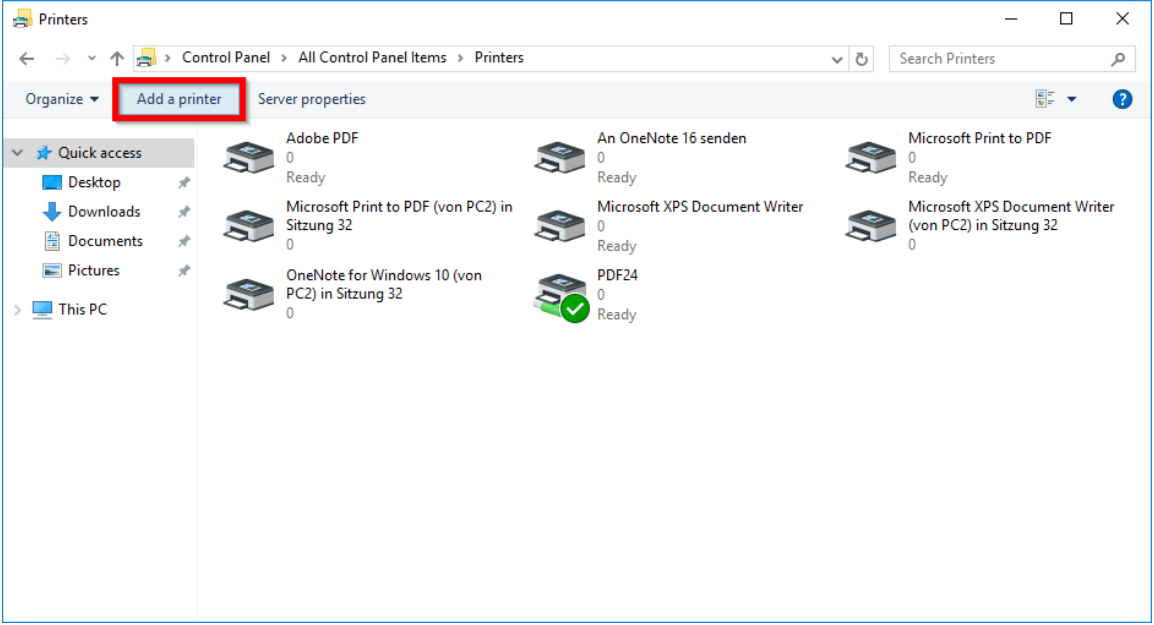
- In the window that appears, all available printers are displayed.
-
-
Now write down all printer names which are also needed in the new environment. 'System Printers' can be ignored (example: Microsoft Print to PDF, OneNote (Desktop) etc.).
-
Open the 'New Citrix'.
-
Right-click on the Windows logo and then click on 'Control Panel'.
-
-
In the window that appears, start the system control element 'Printers'.
-
-
In the Printers control panel, click 'Add Printer'.
-
-
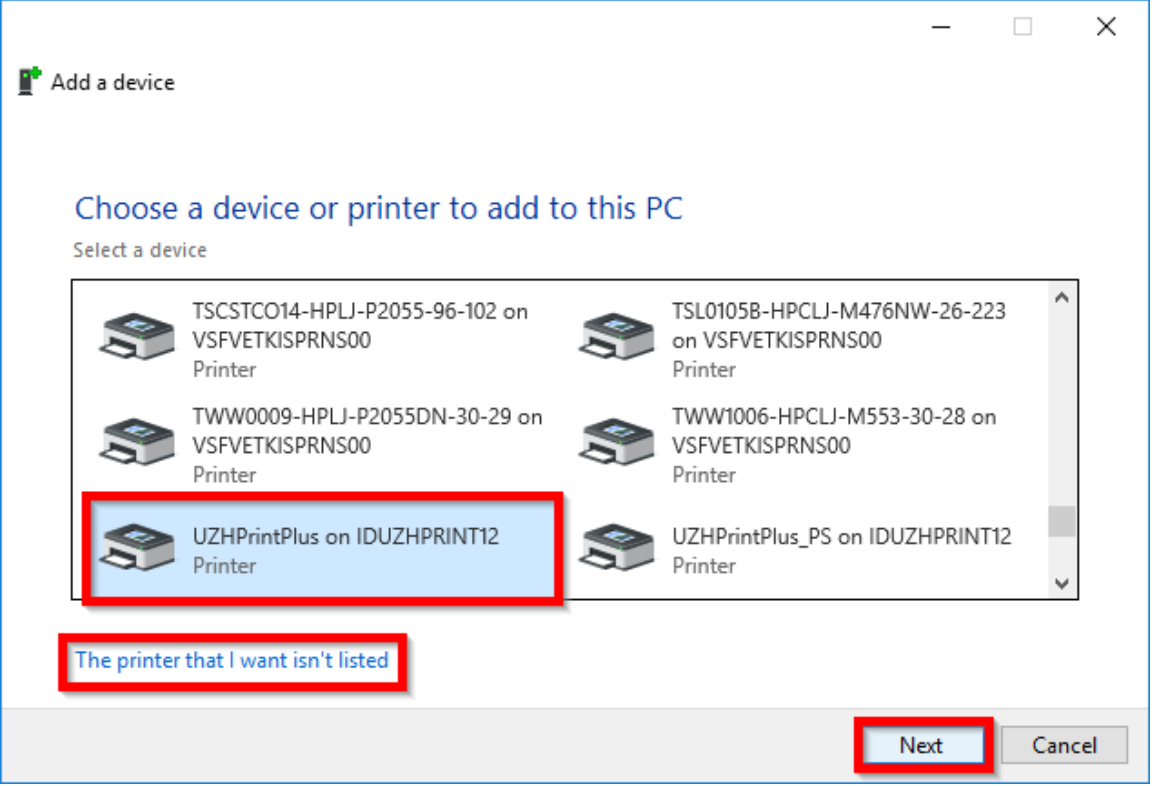
In the wizard that appears, select the desired printer from the list or click 'The desired printer is not included in the list' and then click 'Next'.
-
-
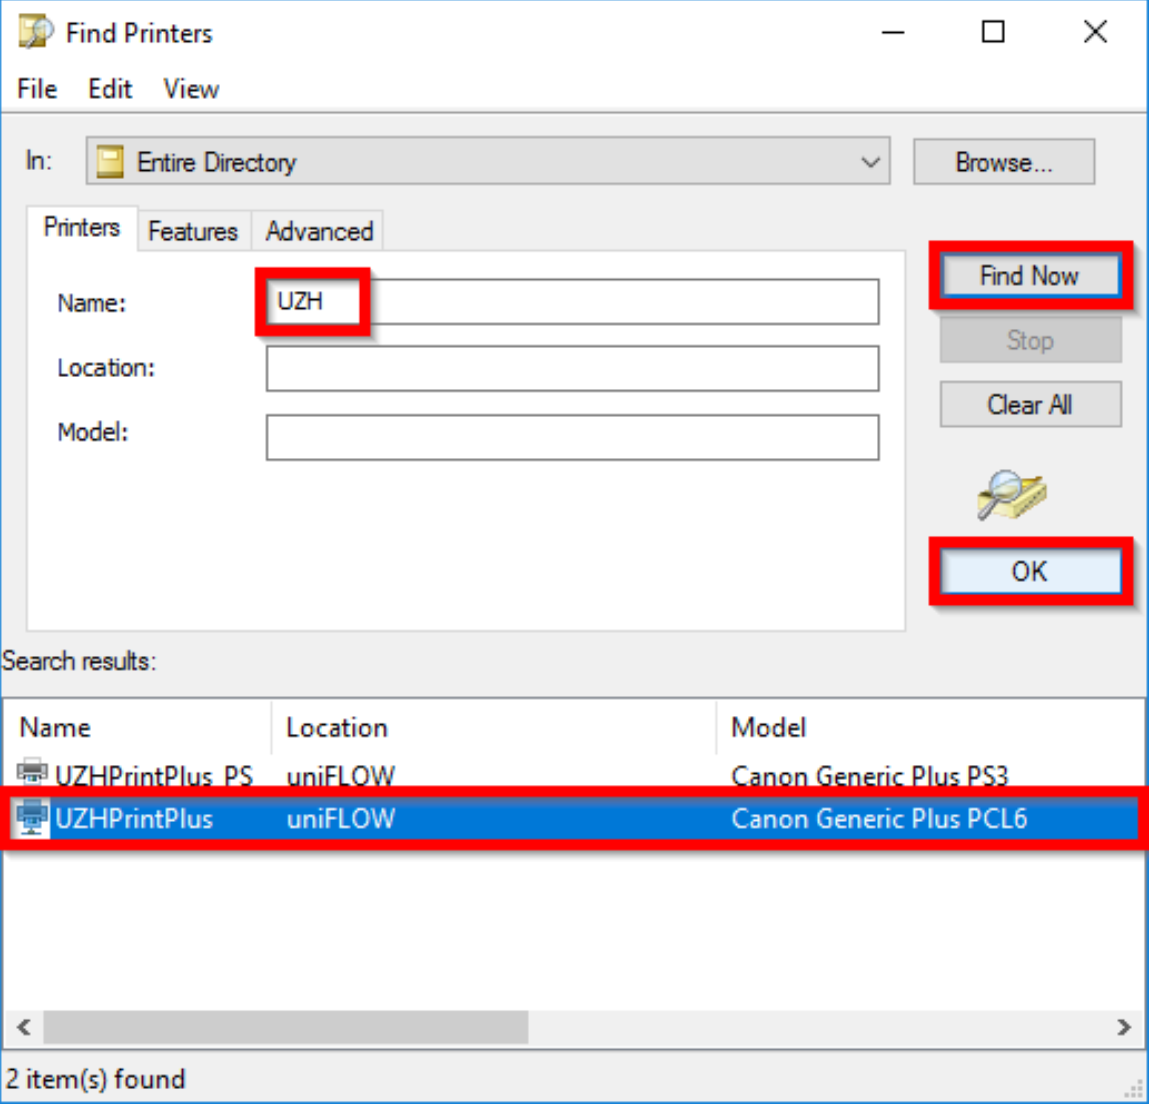
Select 'Find a printer in the directory by location or printer features' and click 'Next'.
-
-
To simplify the search, enter the first letters of the printer name and click 'Search now'. Highlight the desired printer and click 'OK'.
Note: If the desired printer does not appear in the list, please contact your IT manager who can submit an appropriate request to define an additional printer here. -
-
Click 'Next'.
Note: If you are not authorized to use the selected printer, please contact your IT representative who can submit an appropriate authorization request. -
-
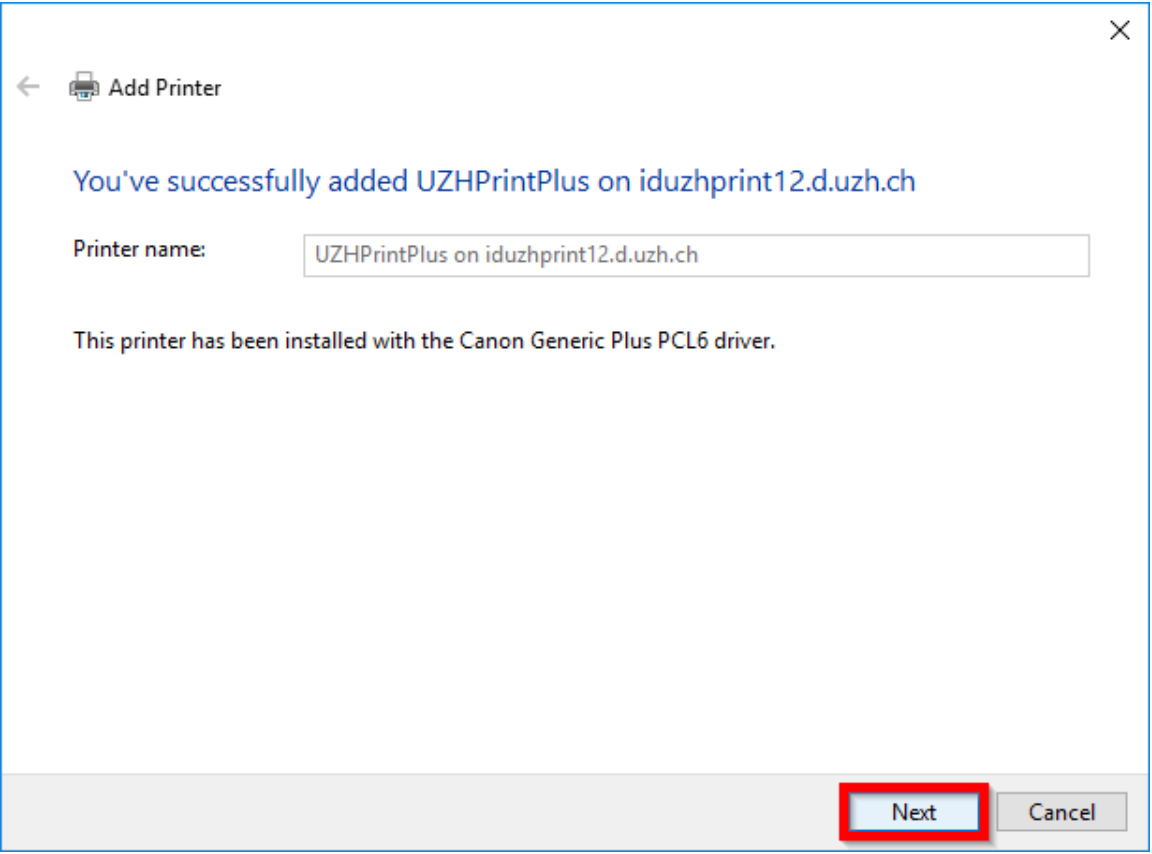
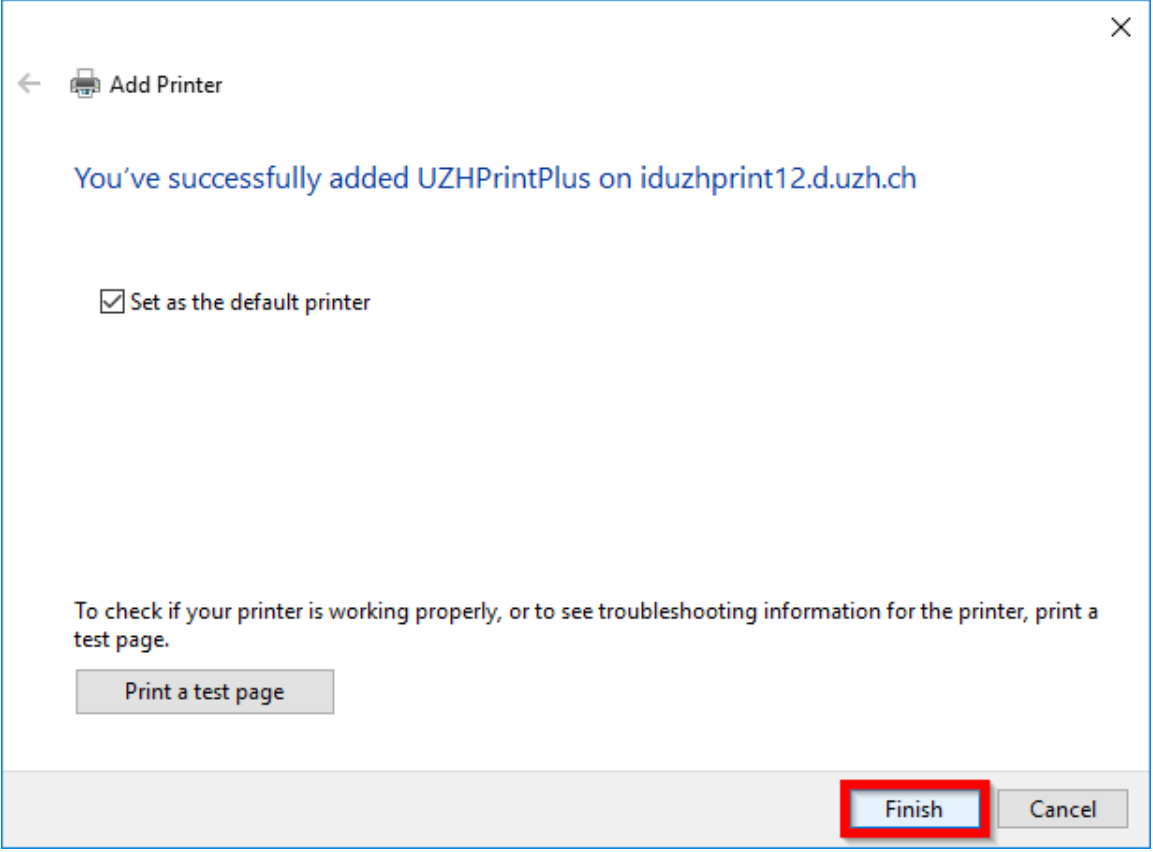
On the last page of the wizard, you have the opportunity to set the printer as default printer and print a test page. Finally, click on 'Finish'.
-

Apply desktop icons
-
Open the 'New Citrix'
-
Open the 'Windows Explorer' and find the 'Y-Drive'. There you will find a folder named 'Windows2022-p'. This folder contains the User Profile (Desktop, Documents, Pictures etc.) of the 'New Citrix'.
The folder 'Windows2016-p' contains everything from the old Citrix environment.
The files and data from the old desktop can be easily copied to the new desktop.
Attention: Links/shortcuts may not work anymore. These links/shortcuts must be created again.
Also affected are the 'Pinned Items' in the taskbar and the start menu.
-
A session with IT can be booked for this purpose. (Please open a ticket for this).
Known Issues
Citrix desktop is not scalable: Citrix and also Microsoft do not support this anymore. Scale the desktop of your client device.
Client drives disappear during a session: This happens, when a session is disconnected, which happens automatically after an hour, if it is not used. We recommend using file servers in the datacenter. Note that you can map your Citrix home including the Citrix desktop to your client device as well.
The upload from client drives directly to applications does not work: We recommend using file servers in the datacenter. Note that you can map your Citrix home including the Citrix desktop to your client device as well.
Links to objects on a client drive do not work: Since the mapped client drives depend on the respective client device, they are not taken into account while initializing the desktop. We recommend using file servers in the datacenter.
Default printers get lost when they are client printers: Since the mapped client printers depend on the respective client device, they are not taken into account while initializing the desktop. We recommend using print servers in the datacenter. Using a form your person responsible for IT can request a printer queue.
The Citrix account cannot be added to the workspace app: This may be because our root certificate is not trusted, or the Workspace App is corrupt. Information on this can be found in our installation instructions, or use the web interface: https://idcitrix.d.uzh.ch/Citrix/ProductionWeb