Wireless connection (WLAN)
Remove any existing network cable to ensure that the data traffic is wireless. If there is a physical on/off switch for wireless transmission on your notebook, make sure it is turned on. On the software side, you must activate the WLAN receiver (adapter) and select the desired WLAN network, public (unencrypted) or uzh (encrypted). We will show you how to do this in the following steps.
Windows - First steps
1.) Open "Network and Sharing Center" in the Control Panel

- In the Windows Start menu, please go to "Control Panel" > "Network and Sharing Center" (upper figure).
- Alternatively, you can open the Windows Start menu to open the Control Panel and access the Network and Sharing Center from there (lower figure).
- Alternatively, use Windows Start Search to find Network and Sharing Center directly.
2.) Open Wireless Network Connection (Adapter Properties)

- In the "Network & Sharing Center" please select "Change Adapter Settings" > "Wireless Network Connection" and click on the context menu command "Properties" (right mouse button).
If no wireless network connection is visible, create a new one. If this is not possible, e.g. because no WLAN is found or the wireless (WiFi) adapter is missing, you probably need to install the WLAN adapter first. Please come to our IT Service Desk (Irchel / Rämi) for a more detailed clarification with your device.
3.) Configure wireless network connection (TCP/IP)

- Select Internet Protocol Version 4 (TCP/IPv4).
- Click the Properties button.
- On the General tab, the data (IP address and DNS server address) must be obtained automatically from the system. Finally, confirm all windows with "OK".
The settings shown here apply to a connection to the WLAN "uzh" or "uzh-5GHz" of the University of Zurich. For a home connection, the specifications of your network provider apply.
4.) (de)activate wireless network connection

- In the Network Center, select the appropriate wireless network connection.
- Click the context menu command Activate (or Deactivate when not in use).
Many newer notebooks have a physical button (switch) to enable/disable wireless (Wifi) connection. If a connection cannot be activated, please check the position of this switch. When activated, a symbolic WiFi light above the keyboard usually lights up.
5.) Establish (disconnect) connection with desired WLAN (uzh/uzh-5GHz)

- In the Network Centre select the appropriate wireless network connection (Fig. left).
- Click on the context menu command "Connect/Disconnect".
- Alternatively click on the network symbol in the task bar (Fig. right). (If the Wifi adapter is switched on, the receivable WLAN networks should be listed here).
- Select the WLAN network "uzh" or "uzh-5GHz" (fig. right)
- Click on the "Connect" (Disconnect) button
Windows - Create wireless network "uzh/uzh-5GHz"
1.) Open "Network and Sharing Center" in the Control Panel
- In the Windows Start menu, please go to "Control Panel" > "Network and Sharing Center" (upper figure).
- Alternatively, you can open the Windows Start menu to open the Control Panel and access the Network and Sharing Center from there (lower figure).
- Alternatively, use Windows Start Search to find Network and Sharing Center directly.
2.) Select "Set up a new connection or network"

3.) Select "Manually connect to a wireless network"

- Click on "Next".
4.) Enter name, security & encryption type (WPA2-Enterprise & AES)

- Network name: "uzh" or "uzh-5GHz"
- Security type: WPA2-Enterprise
- Encryption type: AES
- Click on "Next".
5.) Select "Change connection settings"

6.) Select network authentication method (PEAP)

- Open the Security tab.
- Select network authentication method: "Microsoft: Protected EAP (PEAP)".
- Call up method properties by clicking on "Settings".
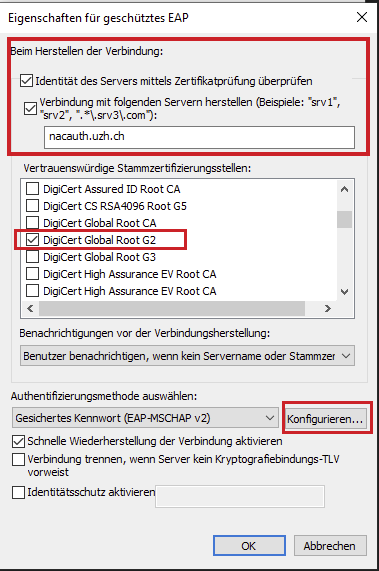
7.) Enter server name & certificate (nacauth.uzh.ch & DigiCert )

- Activate "Check server certificate".
- "Connect to these servers:" nacauth.uzh.ch
- "Trusted Root Certification Authorities:" DigiCert
- Click on the "Configure" button.
- (After the configuration (point 8) click on "OK").
8.) Deactivate the Windows login data query

9.) Specify authentication mode and user data

- Click on "Advanced Settings".
- Activate "Specify authentication mode:".
- Select "User Authentication".
- Click on "Save credentials".
- Enter your user name (e.g. UZH email address) and your Active Directory password.
- Confirm all three dialog boxes with "OK".
10.) Establish (disconnect) connection with "uzh"/"uzh-5GHz"-WLAN

- Click on the network icon in the taskbar (fig. left)
- Select "uzh" and click "Connect".
- If security advices appear, click "Connect" each time (fig. right).
- (Be patient until the information has been exchanged with the server and the connection is established. No further validation steps are necessary, not even a VPN connection).
Mac OS X - First steps
1.) Activate WLAN connection and establish connection

- Click on the network icon in the menu bar and on "Activate WLAN" (fig. left).
- Click on the network icon again and this time on the network "uzh" or "uzh-5GHz" (fig. right).
If the network symbol is not visible in the menu bar, please check your network settings (see point 2).
2.) Check WLAN network settings

- Call up the network component in your system settings (see photo at point 1).
- Click on the service (port) "WLAN" and check whether the checkbox "Show WLAN status in the menu bar" is activated.
MAC OS X - connect to wireless network "uzh/uzh-5GHz"
1.) Open "network component" in the system settings

- Open the network component in the system settings.
2.) Select the "Automatic" environment or create a new one

- Select the "Automatic" environment.
- Alternatively, create a new environment (e.g. "WLAN UZH") by clicking on "Edit environments" and "+" (plus symbol). Confirm by clicking on "Done".
An environment contains network settings (connections, services) that you need when working with your computer, e.g. in the office or at home. In the "Automatic" environment, Mac OS X will automatically search for active network ports for an Internet connection. Searches are performed in the order you have listed them in the Services list.
3.) Enable wireless connection

- Select the service "WLAN" and click on "Activate WLAN"..
If no WLAN service exists, add it using the plus sign ("+").
(If everything appears disabled on the page, remove the protection by clicking the lock in the lower left corner. You will need administrator rights for this).
4.) Select WLAN network "uzh" or create a new one

- Select the network "uzh" or "uzh-5GHz" from the drop-down menu "Network name:".
- Log in with your user data (Shortname, Active Directory password).
- Click on "Connect".
- (Be patient a little until the data has been exchanged with the server and the connection has been established).
If no WLAN "uzh" is visible, re-create it using the drop-down menu list command "Connect to another network". To do this, enter "uzh" or "uzh-5GHz" as the network name, "Company-wide WPA2" as security, your user name and the Active Directory password and click "Connect".
5.) Confirm certificate check

If a certificate check should take place, click on "Continue". (You may need administrator rights for this).
Linux (Ubuntu 19.10) - First steps
1.) Activate WLAN connection and establish connection
-

- Zoom
- Activate WLAN and select network
- Click on the power button (1.) in the menu bar.
- Then click on Power On (2.) and select a network (3.).
- Select the network uzh-guest (4.) and click on Connect (5.).
Alternatively ...
- in the settings (1.) open the WLAN tab (2.).
- Activate the WLAN adapter (3.) in the title bar and ...
- select the uzh-guest network (4.).
ATTENTION! For UZH members we recommend the secure (because encrypted) "uzh" or "uzh-5GHz" WLAN network. If it is hidden, create a new wireless network "uzh" as described in the following section.
2.) WLAN Validation

Authentication (user, code) is required to use the UZH WiFi network free of charge.
- Please enter your mobile phone number (1.)
- Scroll all the way down and accept the general terms and conditions (2.).
- Scroll up and click on Login (3.).
- Enter the access code received on your mobile device (4.) and click on Login (5.).
3.) WLAN network connection successfully established

If the connection is established successfully, the WLAN icon appears in the menu bar and a check mark appears to the right of the wireless network name in the settings. Furthermore, the window title reads "WLAN Connected".
Linux (Ubuntu) - connect to wireless network "uzh/uzh-5GHz"
1.) Select WLAN connection "uzh" and authenticate

- Click the power or network icon (if available) in the menu bar, select the network uzh and click Connect.
- Authenticate as follows:
- Security: "WPA & WPA2 Enterprise"
- Legitimacy: "Protected EAP (PEAP)"
- CA certificate: "DigiCert "
- Username: Your Shortname
- Password: Your Active Directory password
- Click Connect.
You can find information about the root certificate on our website or download it from www.digicert.com for example.
2.) Configure WLAN connection "uzh/uzh-5GHz"

If something is wrong with the uzh connection or no uzh connection appears at all, check the property fields of the existing uzh connection or overwrite them in case of another existing connection. To do this, click on the gear symbol to the right of the connection name in the settings.
- SSID (Identity tab): "uzh" / "uzh-5GHz".
- On the Security and IPv4 tabs, in the Security, Authentication and IPv4 Method fields, select the values WPA & WPA2 Enterprise, PEAP and Automatic (DHCP).
- In the dialog title, click the Apply button (top right).
- Try to connect to uzh again according to point 1.
Android - Remark
Android devices: Please fill in vorname.nachname@uzh.ch or vorname.nachname@institutskürzel.uzh.ch in «identity-» and «anonymous» -fields.